










This River G 3 user guide from Detectors Shop covers assembly, operation, tablet connection and result interpretation, with illustrations from the official manual, videos and specification tables.
What Is the River G 3 Groundwater Detector?
River G 3 (RIVER G 3 Systems) combines a long-range system, a geophysical system and a three-dimensional display of search data. This guide explains assembly, settings, probe connections and result screens using the official manual and manufacturer specifications.
The manual describes resistance measurement and analysis between ground probes. The 3D view represents the data processed by the device; it is not a photograph of underground water.
Visit the River G 3 groundwater detector product page for the current offer, or browse the Detectors Shop store for available equipment.
River G 3 at a Glance
| Item | Details |
|---|---|
| Purpose | Searching for indications of groundwater, wells and underground springs |
| Systems | Long range, geophysical and 3D result display |
| Site settings | Language, continent, country and soil type |
| Probes | Four geophysical probes and a separate long-range probe |
| Reports | Main screen, tablet display and printed report |
| Detectors Shop warranty | Five years provided by Detectors Shop, subject to warranty terms |
| Published depth and range | Up to 1500 m depth and 3000 m front range, as advertised by the manufacturer; not guaranteed site results |
Range wording varies in the manual and manufacturer page. Front range and surveyed area are different quantities and should not be used interchangeably.
River G 3 Introduction Videos
Detectors Shop also supplied an Arabic-language customer-use video from Somalia. It is included in the Arabic edition. No verified drilling-depth, well-yield or water-analysis records were supplied for this guide.
Package Components and Their Functions
Detectors Shop confirms that the supplied package matches the official manual. Identify the components before assembly and keep the geophysical and long-range accessories organised separately.
| Component | Function |
|---|---|
| Main geophysical unit | Probe, battery and data connections, scanning and integrated printer |
| Long-range unit | Search settings and direction display with handle and antennas |
| Transmitter, receiver and antennas | Long-range assembly according to the official diagram |
| Four probes and their cables | Measurement points around the main unit |
| Long-range probe and cable | Ground connection through the LONG RANGE port |
| Tablet | RIVER G software and 3D data display |
| Two external batteries | 2500 mAh for long range and 5000 mAh for geophysical, as labelled in the manual |
| Data transfer cable | Main-unit to display-unit connection |
| Charger and car charger | Charging with the appropriate supplied accessory |
| Integrated printer and two cases | Report printing, transport and protection |
River G 3 Technical Specifications
The following values summarise the manufacturer’s River G 3 specifications. Main-system and long-range data are separated; total kit weight is not handheld-unit weight.
| Specification | Geophysical / main display | Long range |
|---|---|---|
| Display | 8-inch colour touch screen, 800 × 600 px | Colour, 480 × 270 px |
| Published frequency | 2.91 kHz | Up to 500 kHz |
| Data processing | 11 MHz | 8 MHz |
| Battery | 10.8 V, 54 Wh | 10.8 V, 27 Wh |
| Advertised runtime | 8–12 hours | About 10 hours |
| Operating temperature | 0–60°C | 0–70°C |
| Water protection | Not waterproof | Not waterproof |
| Measurement accessories | 20 m cables; published probe length 810 mm | Published probe length 340 mm |
Published total kit weight is 16.7 kg: 7.5 kg for the systems case and 9.2 kg for the accessories case. Each case measures 53 × 40 × 22.8 cm. The long-range device alone is listed at 500 g.
The manual refers to 65 cm probes or ground insertion, while the specification page lists a geophysical probe length of 810 mm. Do not confuse insertion depth with overall length; follow the instructions for your supplied kit. Runtime varies with use and battery condition.
River G 3 User Guide: Site and Battery Preparation
- Charge with the original charger and inspect cables, connectors and batteries.
- Record site boundaries, soil type, ground condition and actual distances.
- Locate buried services before inserting probes. Keep clear of power lines, vehicles and interference sources.
- The manual advises avoiding rain and very wet ground, and waiting at least 15 days after rainfall until the soil dries. Follow manufacturer instructions; elapsed time alone does not establish site dryness.
- Do not force probes into hard rock. Use a rubber hammer as instructed.
- Route cables away from walking paths and complete the required connections before measurement.
- The manufacturer advises keeping carried metal and electronic devices away during long-range operation.
- Stop and recharge if the battery alarms or the unit shuts down. Do not repeatedly restart on a low battery.
River G 3 User Guide: Long-Range Operation
This section follows the manufacturer’s operating sequence. Treat direction indications as initial guidance requiring repeat checks; antenna movement alone does not establish a drilling location.
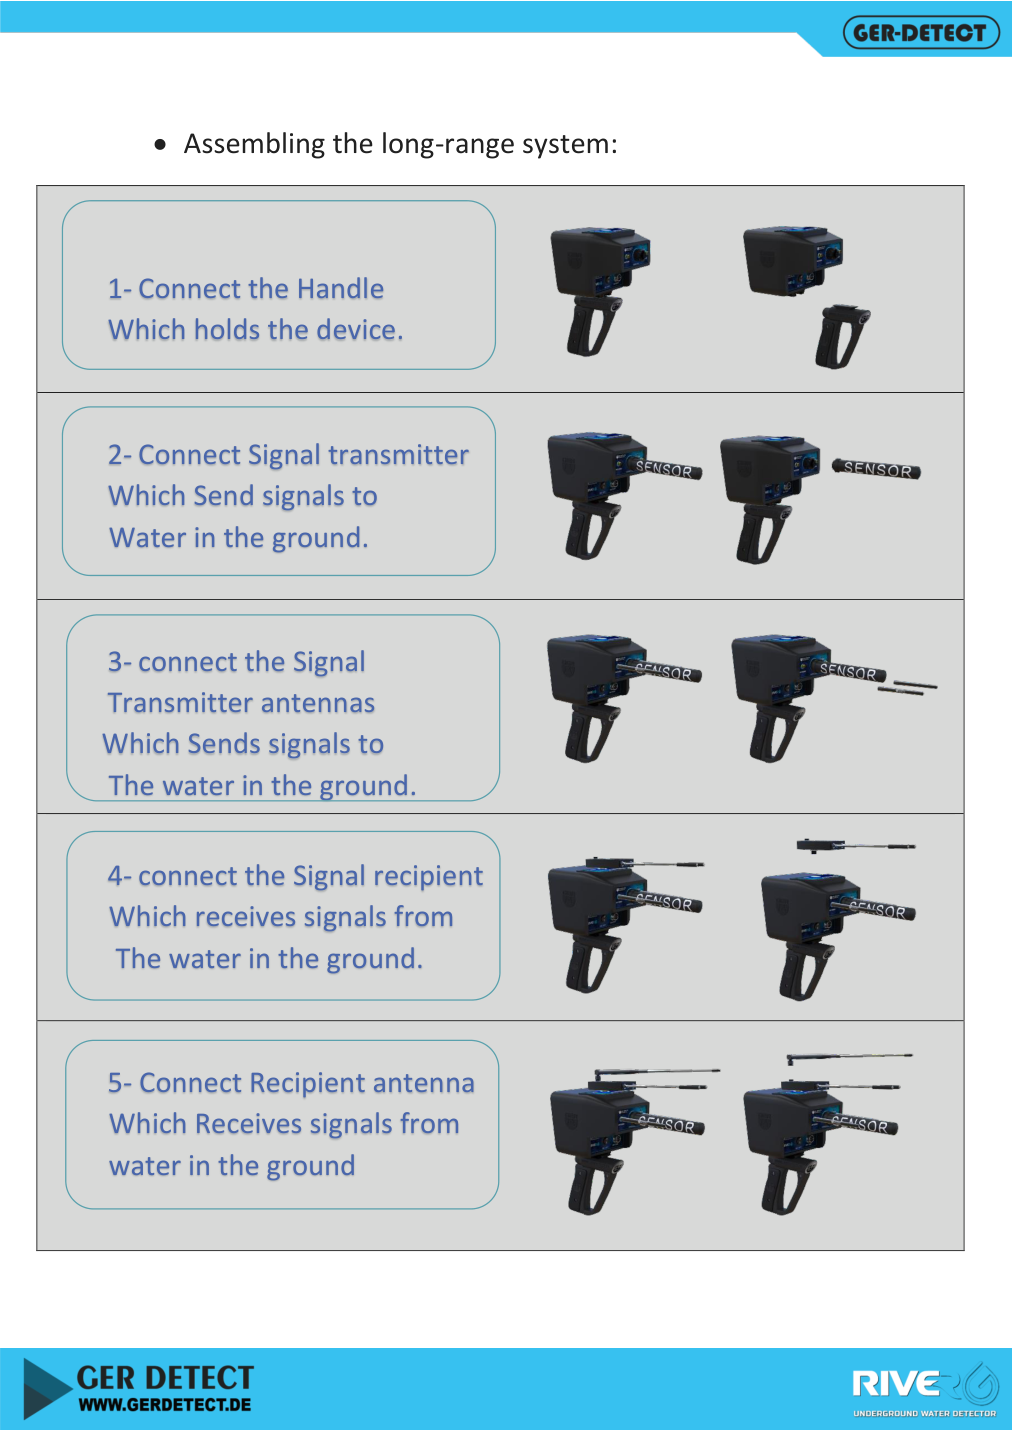
- Fit the handle, signal transmitter and its antennas, then the receiver and receiving antenna.
- Extend the receiving antenna as instructed and connect the 2500 mAh long-range battery.
- Connect the data cable between the main and display units. Insert the long-range probe and connect its cable to the LONG RANGE port.
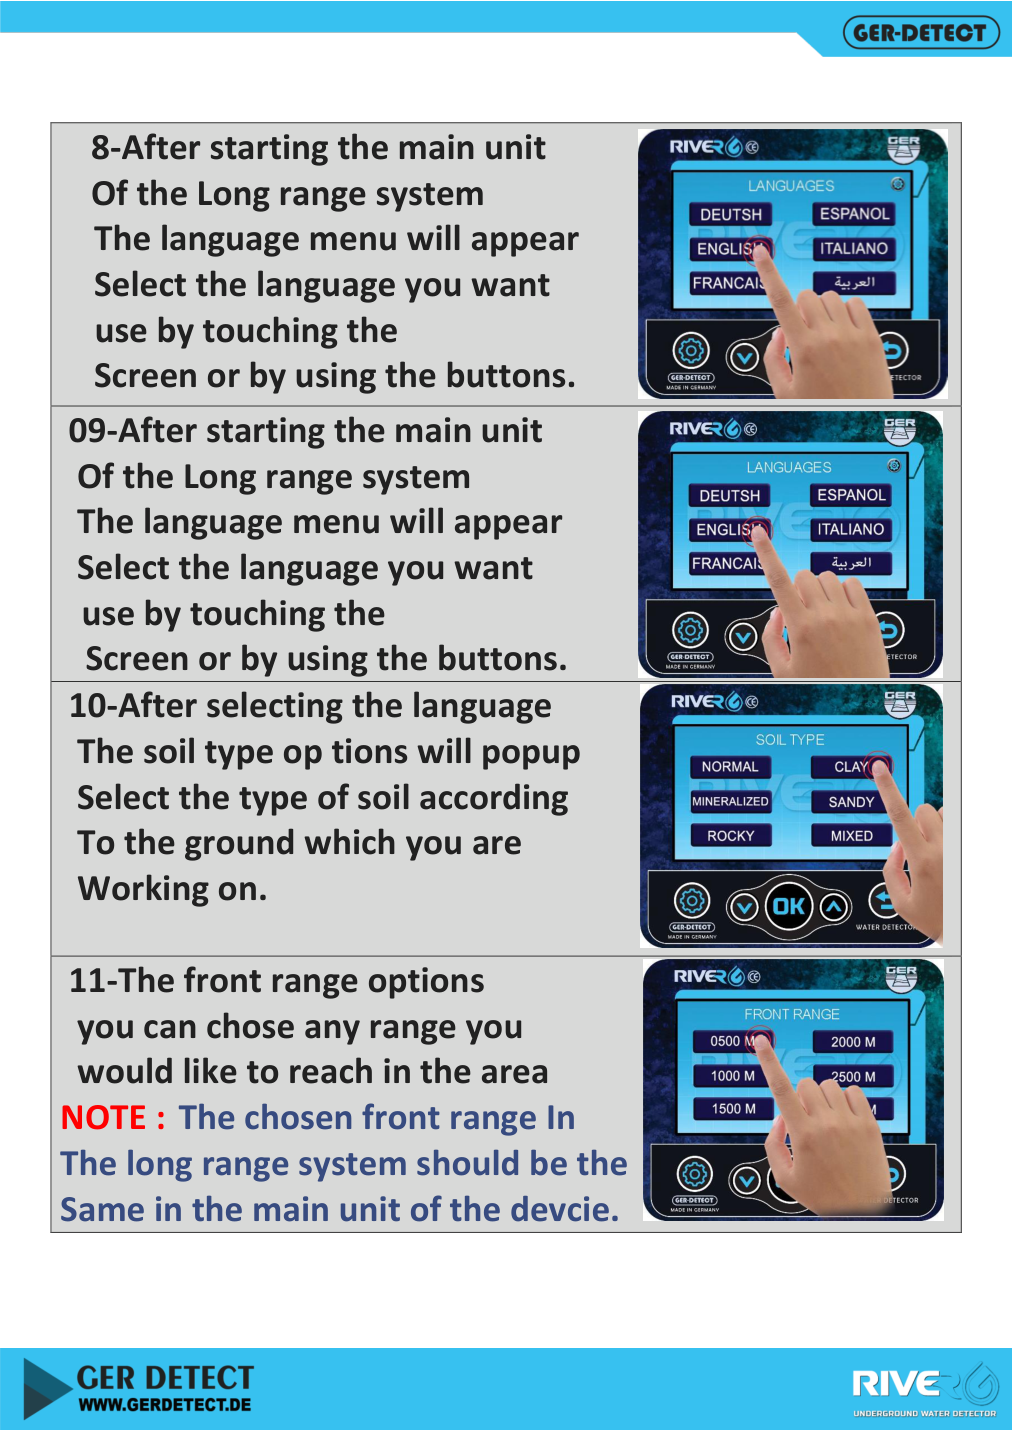
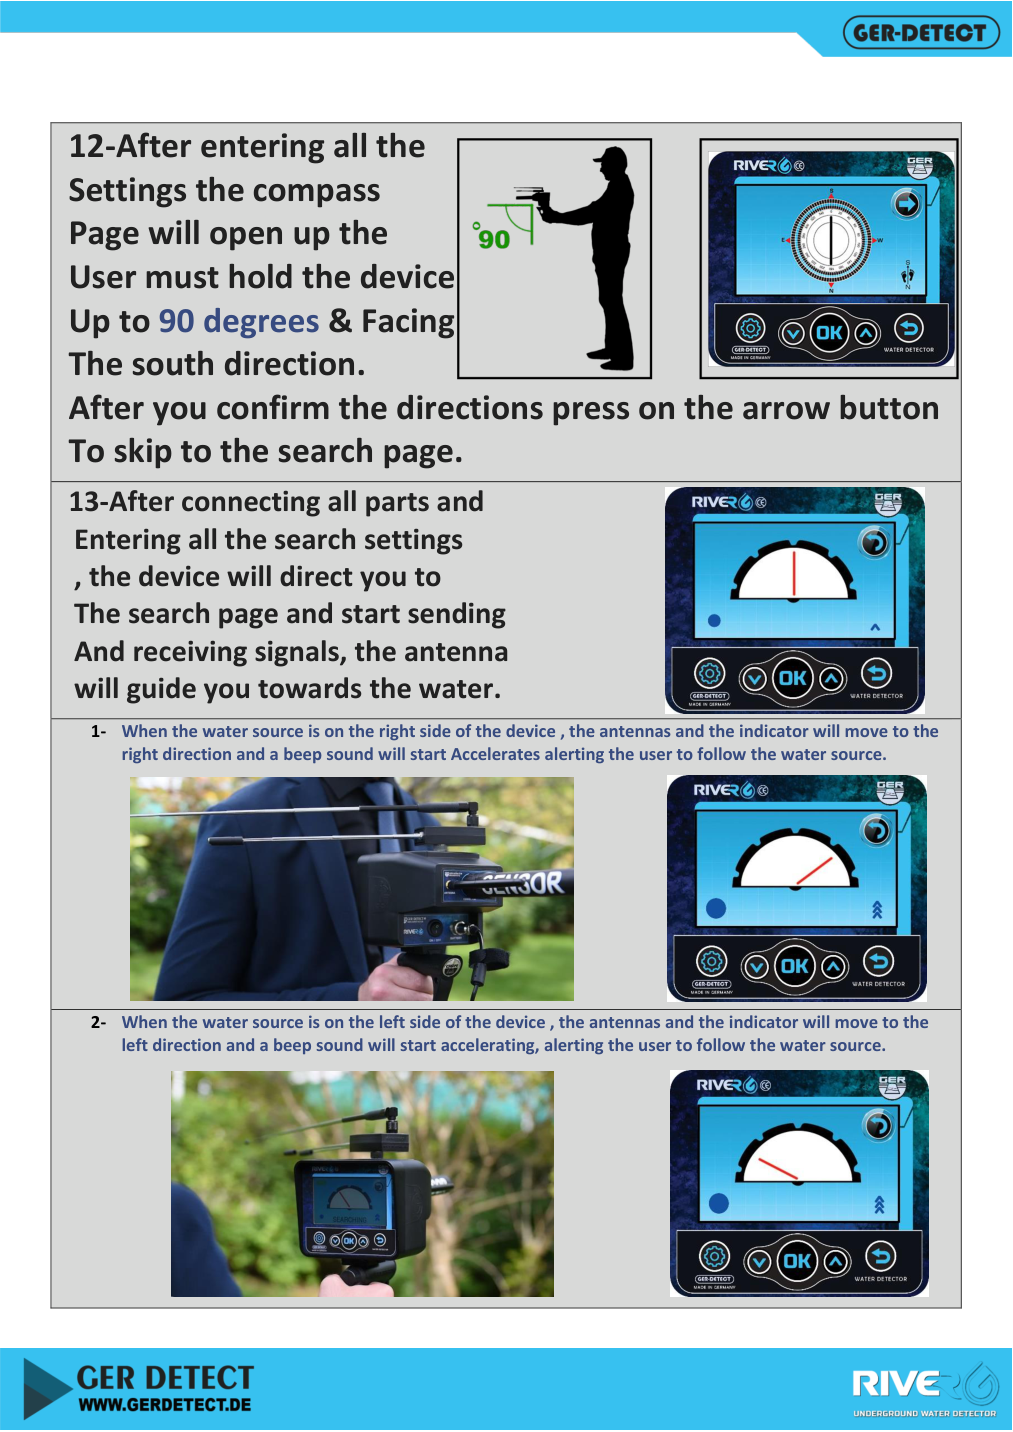
- Switch on the main unit, choose language, continent and country, then LONG RANGE and the required range.
- Switch on the long-range battery and handheld unit, then choose language and soil type.
- Match the handheld range setting to the main-unit setting.
- At the compass screen, follow the holding position and south-facing direction shown in the manual, then proceed to search.
- Observe direction, audio and antenna indications. The manual describes right or left movement and a backward turn after passing the indicated location.
- Record the candidate area, repeat from different directions and compare it with a probe-based scan.
Geophysical Assembly and Probe Layout
- Connect the 5000 mAh geophysical battery to its designated input and connect the data cable to the display.
- Assemble the two sections of each probe and place the four probes at the corners of a square around the main unit.
- Insert probes as instructed, maintaining ground contact without forcing them into solid rock.
- Connect the four cables to the numbered inputs and corresponding probes. Preserve numbering when repositioning.
- Measure the square side: for a 10 m side, enter 10 m in the probe-distance setting. This is adjacent-probe spacing, not the square diagonal.
- Switch on the unit and select language, continent, country, GEOPHYSICAL, soil type and the actual probe distance.
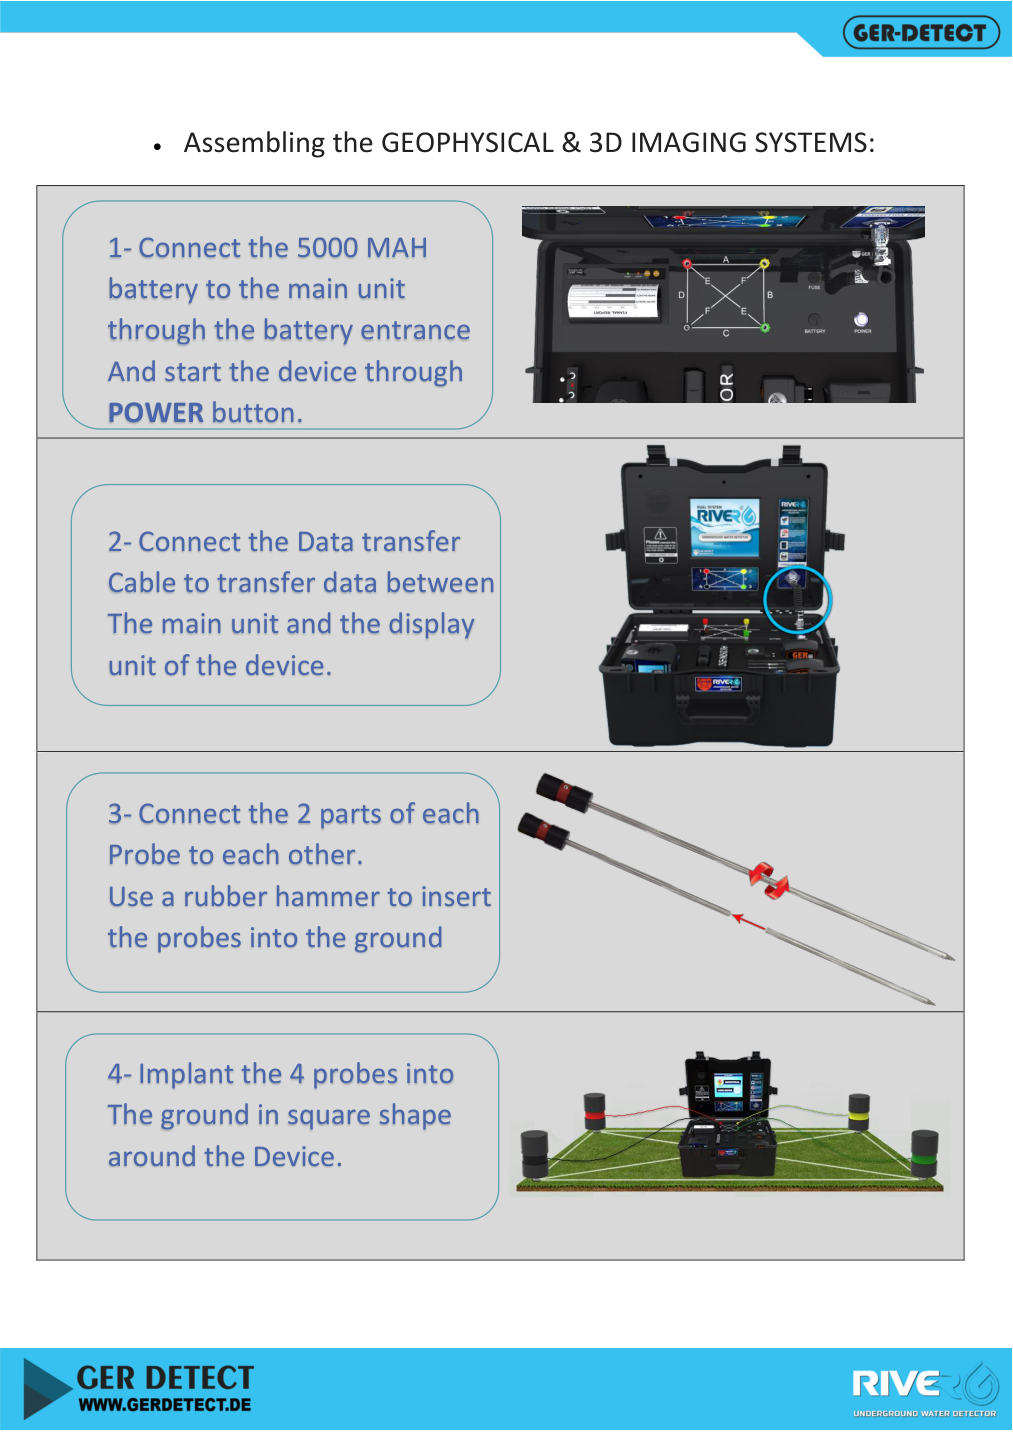
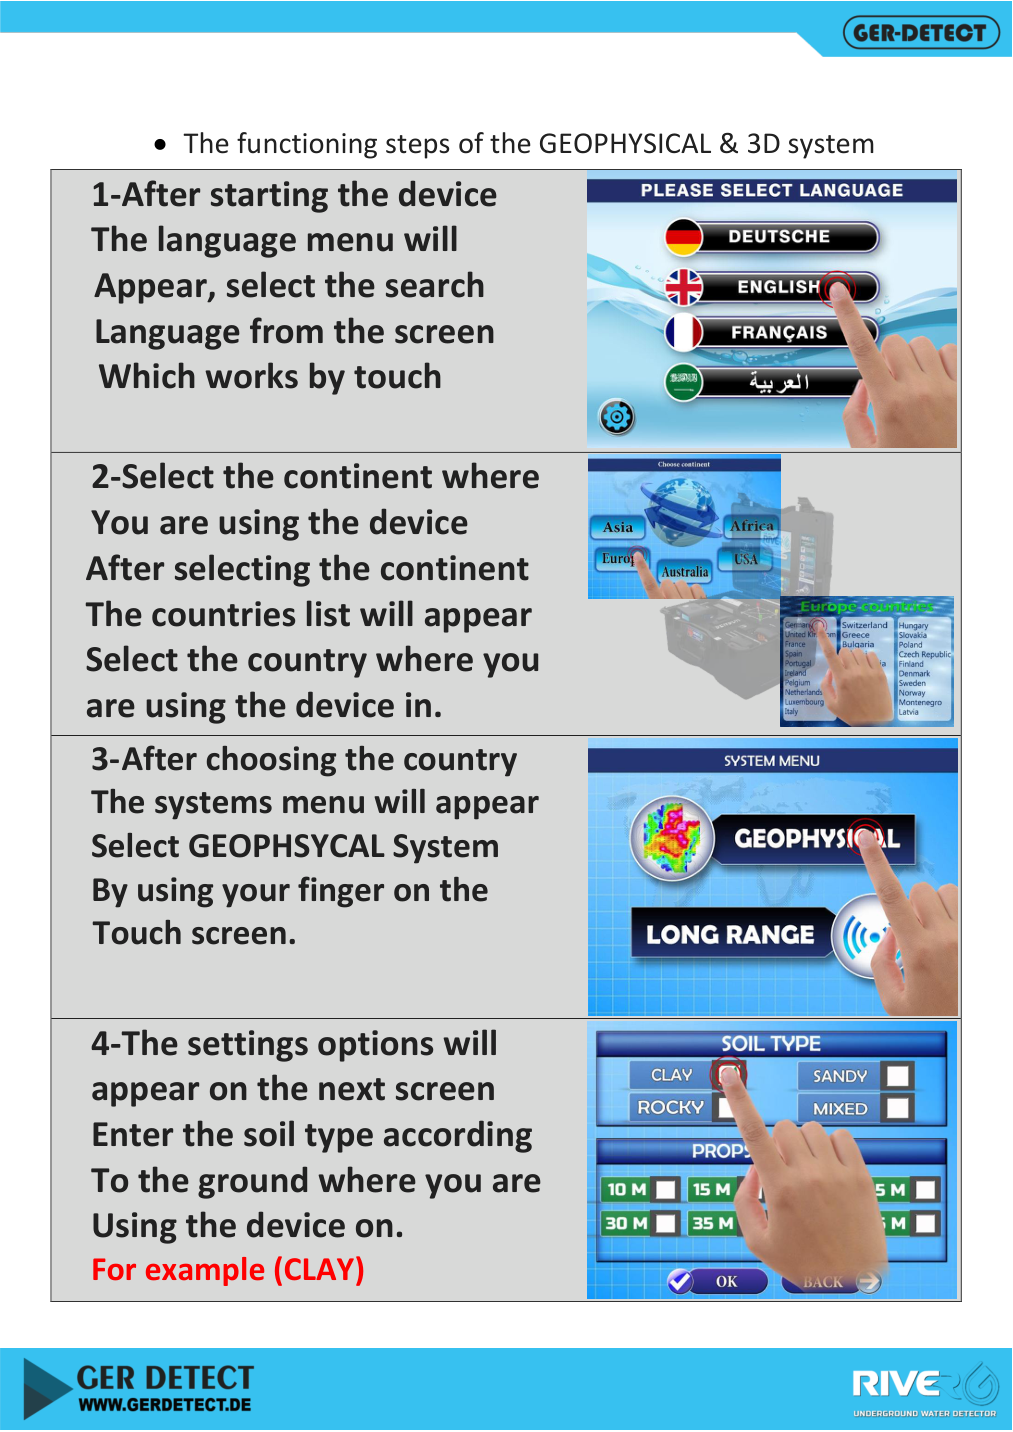
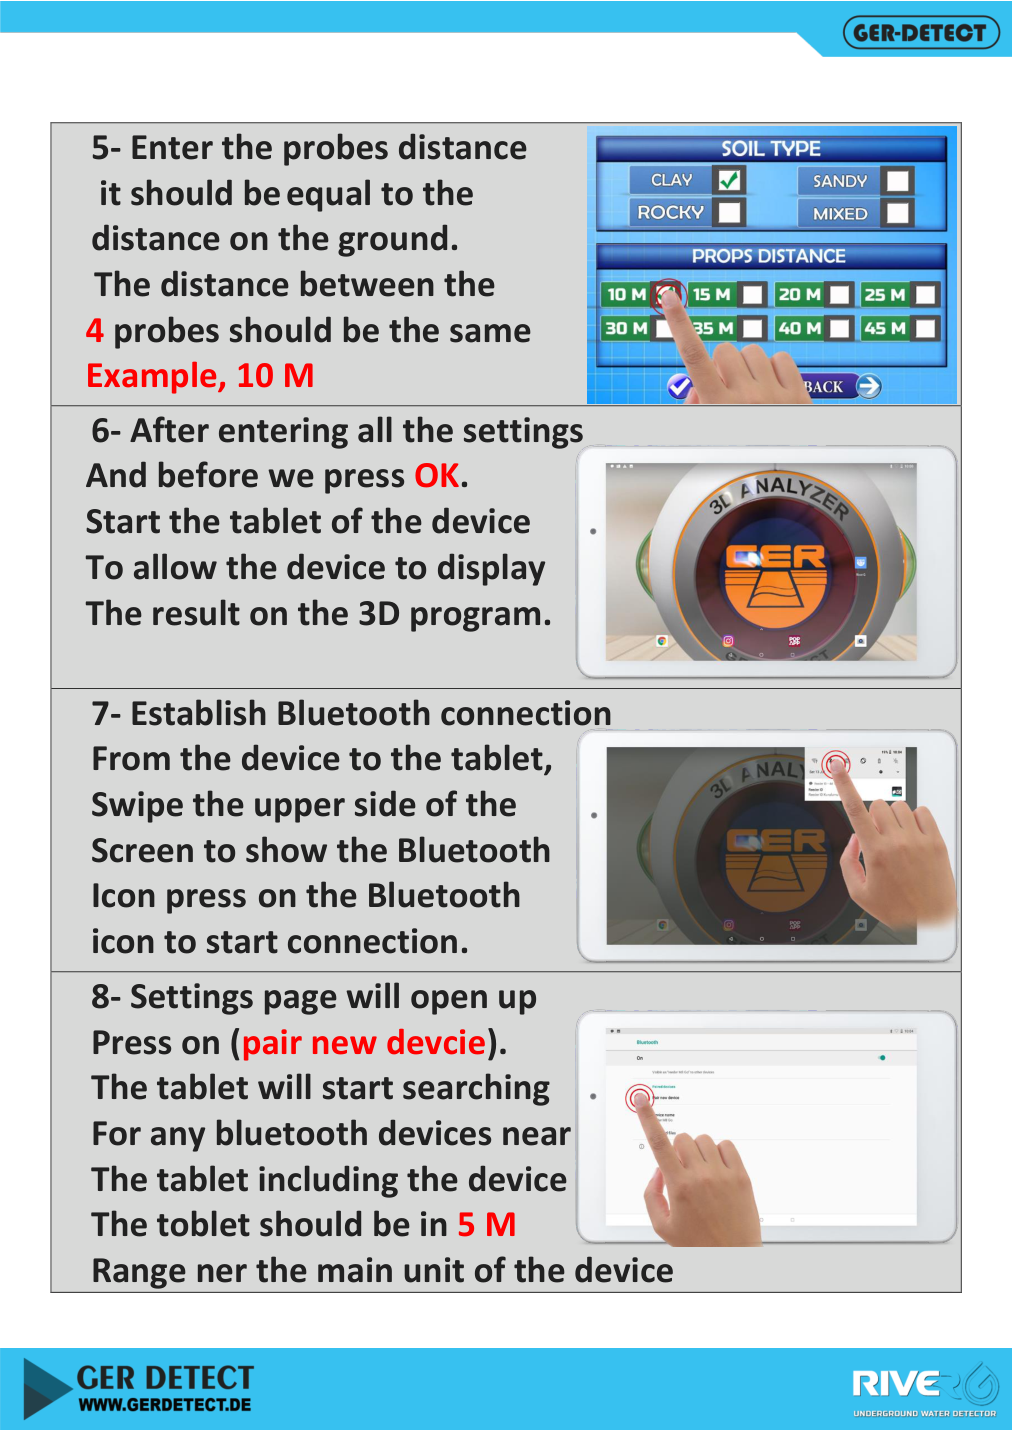
Example: A square with a 10 m side has four equal sides. Its diagonal is longer; do not substitute diagonal length for side spacing. Check numbering and connections before scanning.
Connecting the Tablet and Starting the 3D Display
- Switch on the tablet before confirming the soil and probe-distance screen.
- Enable Bluetooth and choose Pair new device. Keep the tablet within 5 m, as instructed.
- Select RIVER G and enter pairing code 1000 when prompted.
- Open the RIVER G application and select NEW.
- Wait for connection confirmation. The manual mentions about five seconds; actual timing may vary. The main-unit Bluetooth light becomes steady after connection.
- Confirm settings with OK on the main unit, then press START on the tablet.
- Wait for the scan to complete, then open additional details and the 3D view.
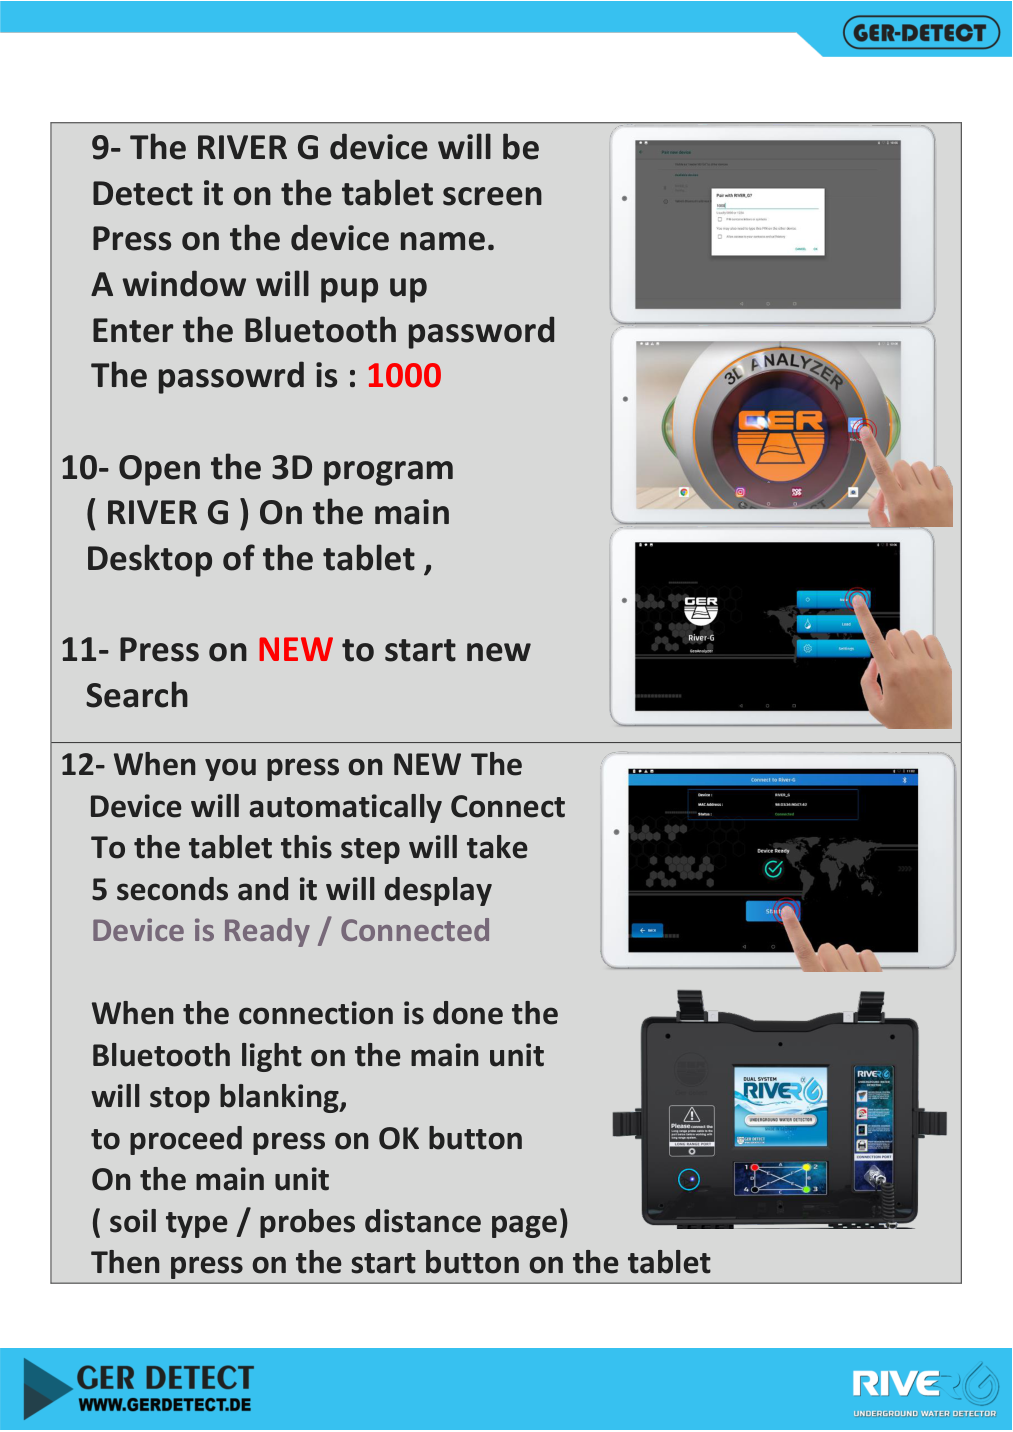
The 3D display uses geophysical-system data. Rotate the view with your finger and compare numeric readings across scans rather than relying on the shape alone.
River G 3 User Guide: Reading and Interpreting Results
| Field | How to interpret it |
|---|---|
| Water type | A device classification, not laboratory certification of drinking suitability |
| Depth | An estimated value or interval requiring repeat comparison and geological verification |
| Salinity | A displayed indicator, not analysis of a recovered water sample |
| Water rate / density | A relative software indicator, not litres or well pumping yield |
| Rock percentage | A report indicator, not a confirmed description of all underground layers |
| Lines A–F | Six measurement paths between four probes, as shown in the manual |
| 3D VIEW | A visual representation of processed scan data |
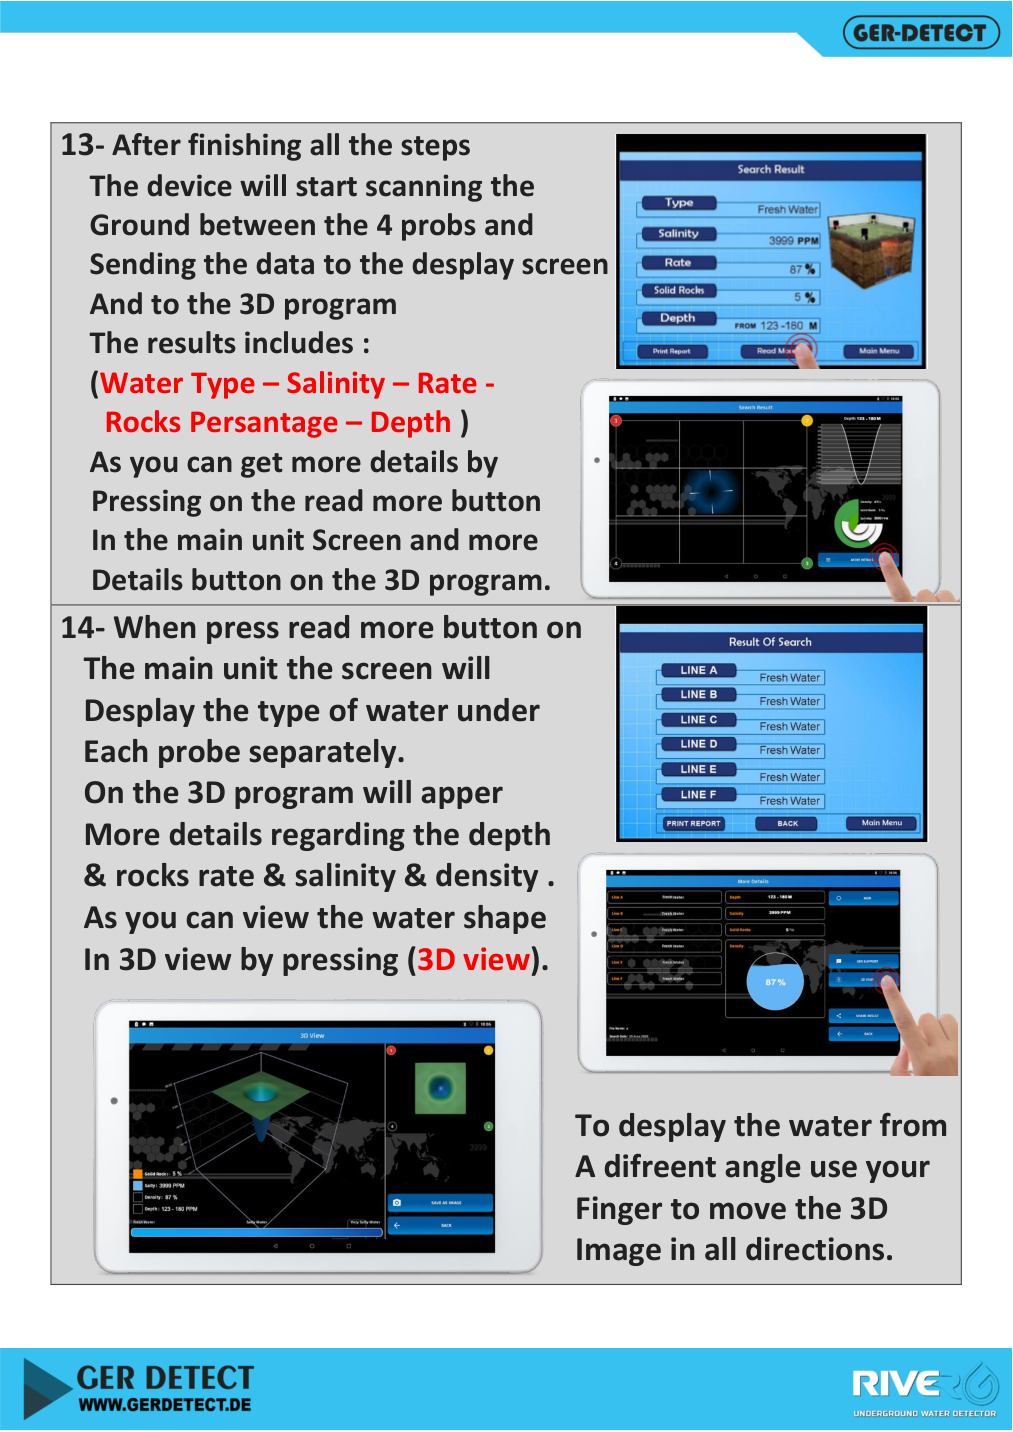
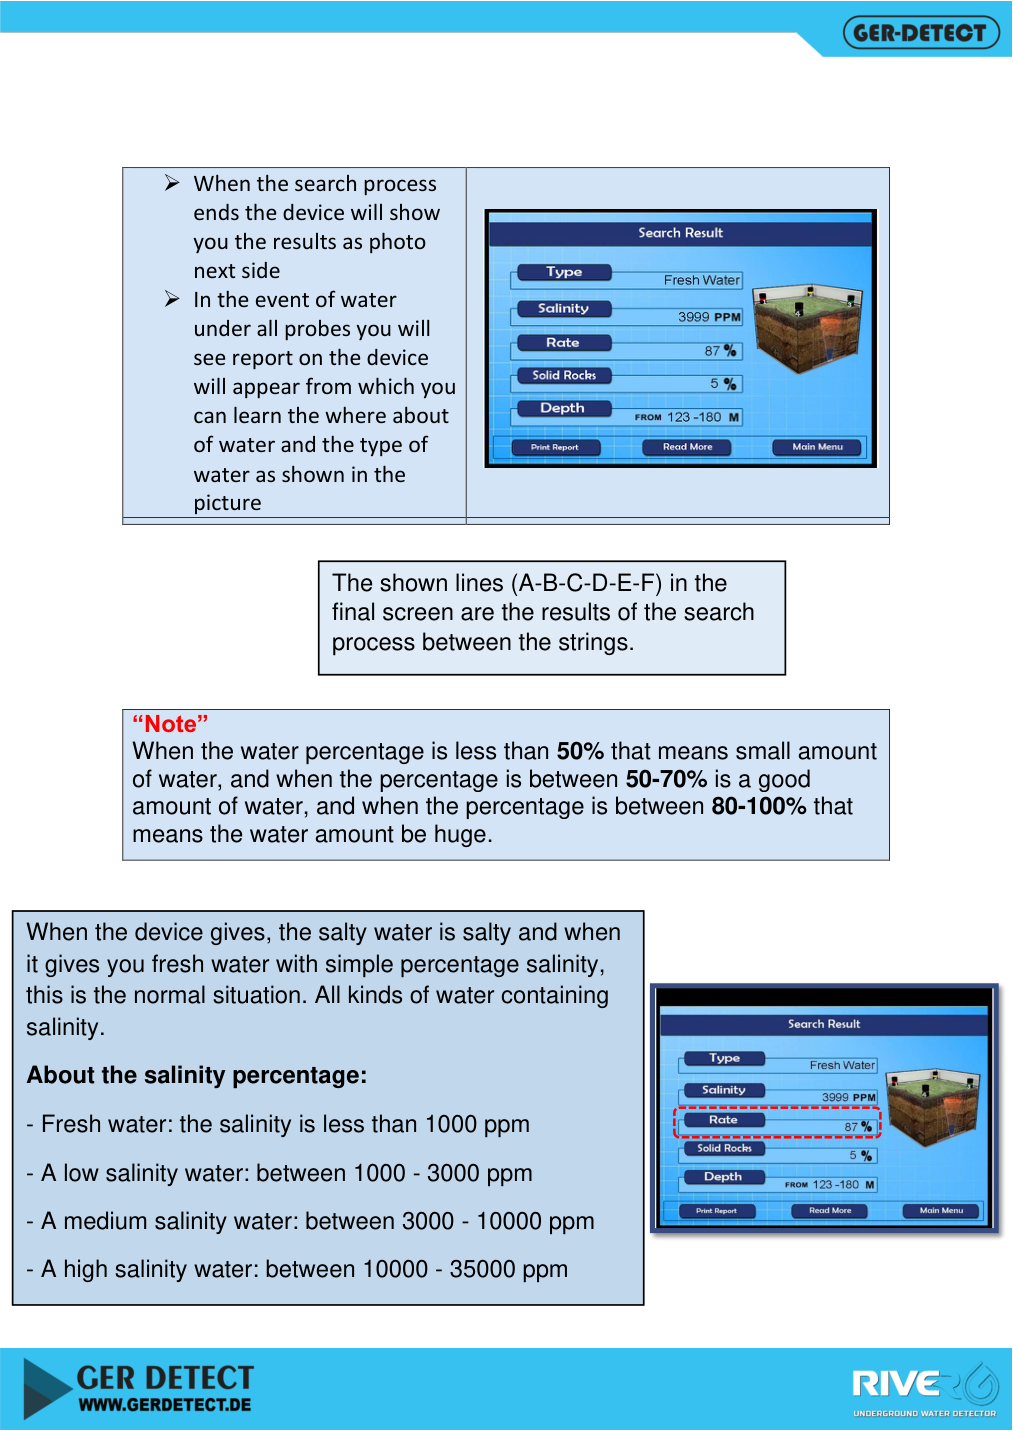
The manual uses salinity categories below 1000 ppm, then 1000–3000, 3000–10000 and 10000–35000. These are manual classifications, not a drinking-water suitability standard. Confirm water quality with analysis of an actual sample.
Water-density percentage bands differ within the manual. This guide therefore does not impose one apparently precise quantity scale. Use the indicator for comparison within the device; do not convert it into well yield or aquifer storage.
Handling No Result and Repositioning Probes
If No Result appears, inspect the report and A–F paths. The following procedures come from the manual and must be used with its numbered-probe diagrams. Remeasure spacing and update settings before repeating.
| Manual case | Described action |
|---|---|
| Indication on A only | Move probe 3 to position 2 and probe 4 to position 1, then reposition 1 and 2 to form a new square and rescan |
| Indications on A, B and E | Find the indicated triangle centre, move probe 4 there, then reposition probes 1, 2 and 3 to form a square and rescan |
| Indications on A and E | Use one of the preceding procedures, or move 4 to position 2 and reposition the remaining probes as illustrated |
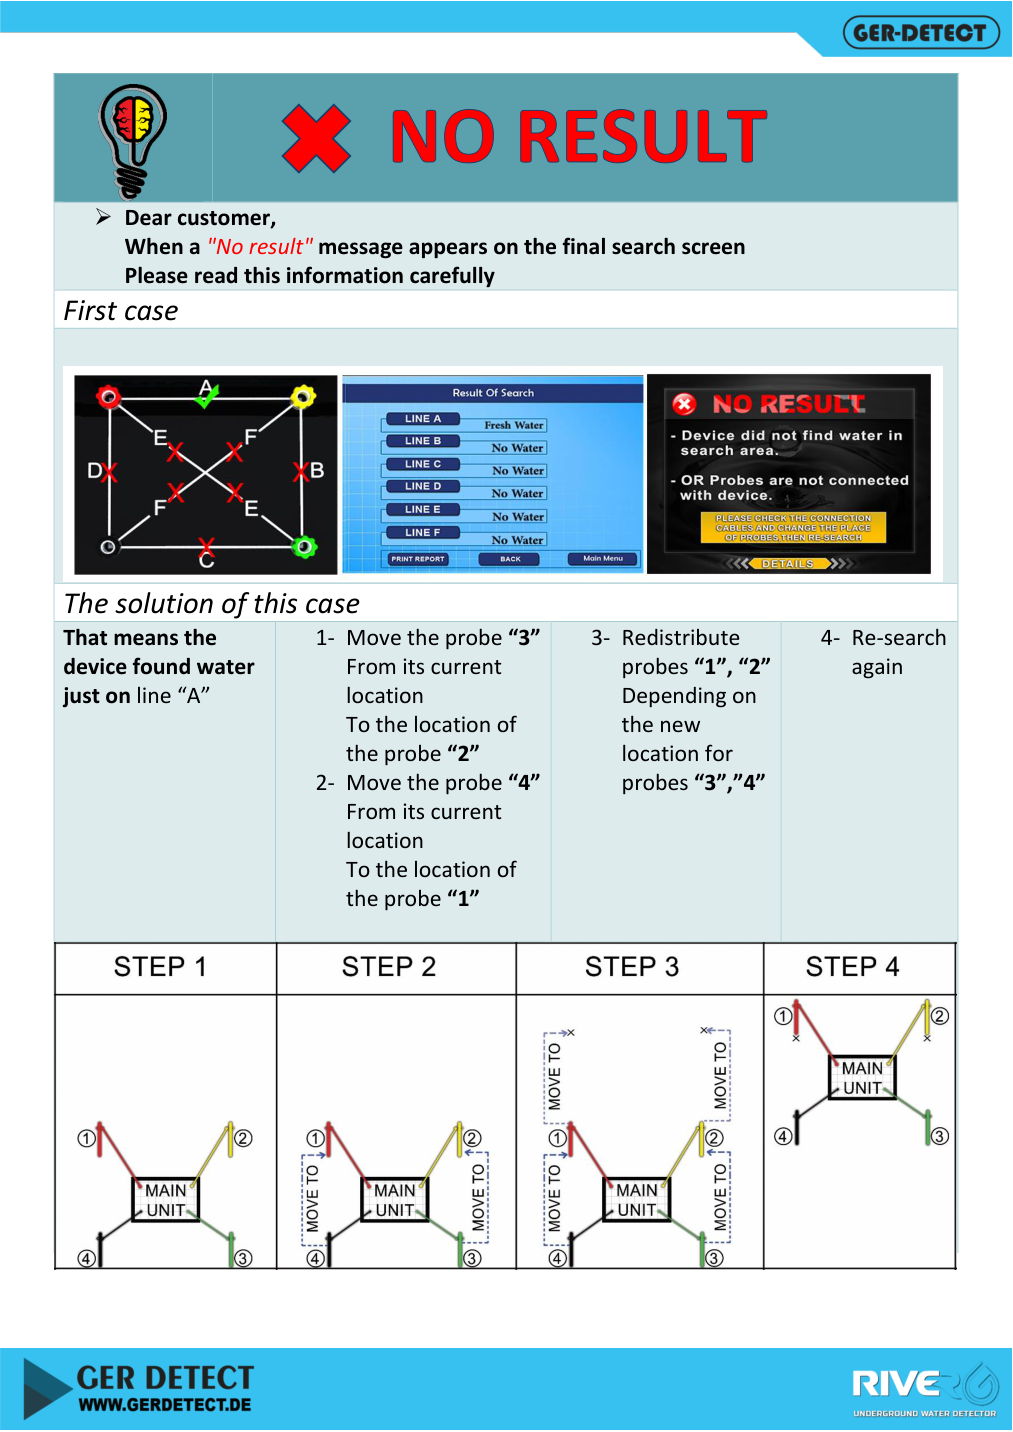
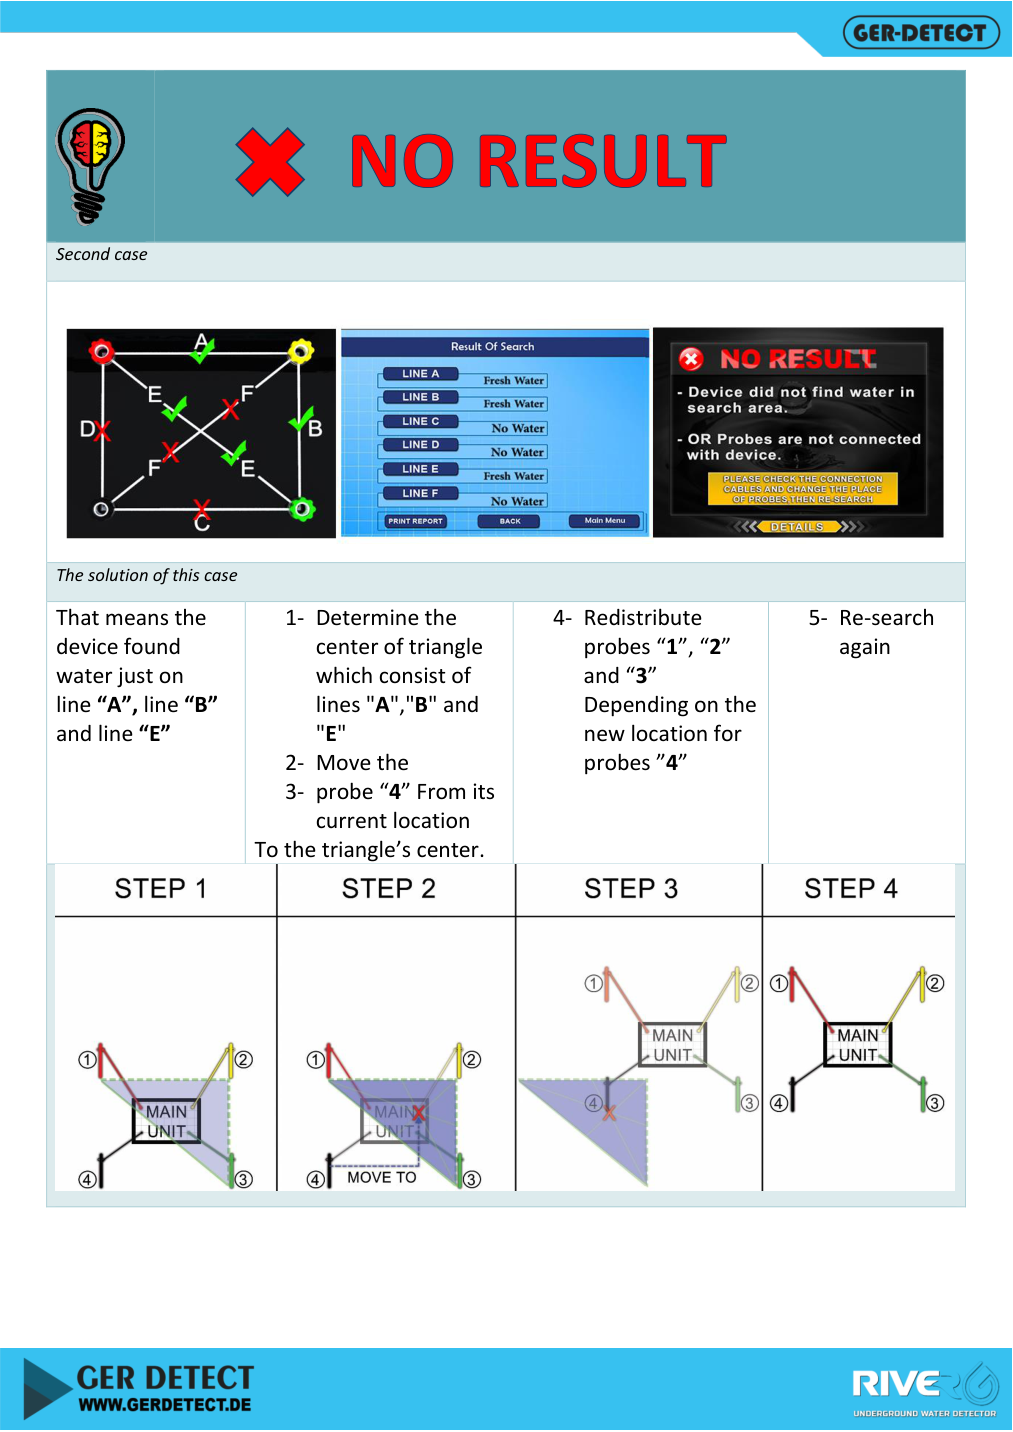
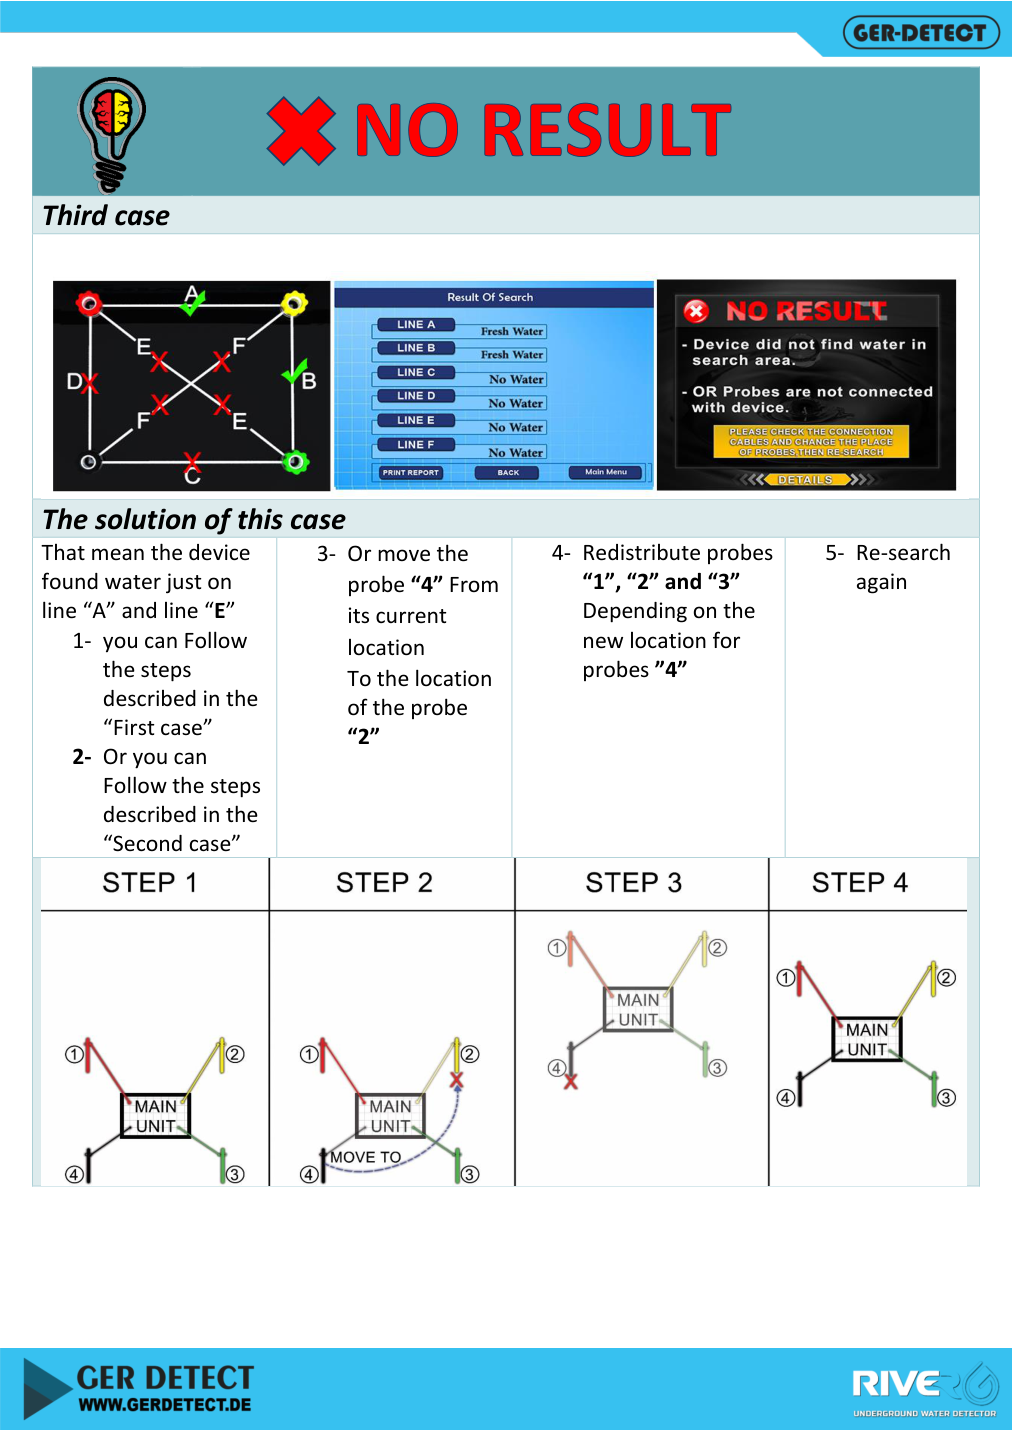
For No Water, the manual mentions incorrect cable connections or very saline water. These are not an exhaustive diagnosis. Check connections, contact and settings, repeat measurements and consider that the scan may not provide sufficient evidence of groundwater.
Common Operating Problems and Checks
| Problem | What to check |
|---|---|
| Readings vary between scans | Ground condition, probe spacing, connections, soil setting and location changes; varying depth alone does not prove several water channels |
| Range differs between units | Match long-range and main-unit range settings |
| Bluetooth will not connect | Power, Bluetooth activation, tablet proximity, RIVER G selection and code 1000 |
| Limited depth information | Repeat after checking connections, distances and site condition |
| Alarm followed by shutdown | Stop and recharge the correct battery with the original charger |
| Poor probe contact | Check insertion according to the manual and avoid unsuitable solid-rock locations |
| Connected tablet but no scan | Check NEW, main-unit OK confirmation and application START |
Printing Reports and Recording a Survey Before Drilling
The device includes a printer and a PRINT REPORT option on the result screens illustrated in the manual. After a completed scan, check the fields and use the printing option. Do not assume a particular save or export format unless it is available in your software version.
- Record survey date, location, soil type and ground condition.
- Sketch numbered probe positions and spacing.
- Record settings, depth interval and water, salinity and rock indicators for each scan.
- Keep screen photographs and printed reports; compare initial and repeat scans.
- Have a groundwater or geological specialist assess the findings before drilling. Well yield and water quality require independent verification.
River G 3 Warranty and Detectors Shop Support
When purchased from Detectors Shop, River G 3 comes with a five-year warranty provided by Detectors Shop, subject to its terms. This is the retailer’s warranty; the manufacturer manual specifies a different term, so the five years are not presented as a factory warranty.
For the current price, package and training enquiries, visit the River G 3 page at Detectors Shop. Contact the team for connection and setup guidance before first use, and keep your invoice and warranty documents.
RIVER G 3
View River G 3 and its current price
Refer back to this River G 3 user guide when preparing the detector to check connections, probe spacing and tablet pairing steps. For help applying the instructions to your equipment, contact Detectors Shop through the River G 3 product page.
Frequently Asked Questions About River G 3
Is River G 3 a water detector or a gold detector?
This model is intended for groundwater, wells and springs according to the manufacturer. It is not presented here as a gold detector.
Can a beginner use it?
Yes, after training in assembly, probe layout and settings. Result interpretation and drilling decisions require additional expertise and verification.
What probe spacing should I enter?
Enter the actual distance between adjacent probes in the square, not its diagonal. Keep the four sides equal.
What is the River G Bluetooth pairing code?
The manual pairing code is 1000. Keep the tablet within five metres of the main unit as instructed.
Does water percentage indicate well yield?
No. It is a device indicator, not pumping yield in litres or groundwater storage. Yield requires actual well testing.
Does a fresh-water label mean the water is safe to drink?
The label alone is insufficient. Drinking suitability requires testing an actual sample against applicable requirements.
Is a 1500 m detection depth guaranteed?
It is a manufacturer-advertised figure, not a guarantee for every site. Displayed values require repeat checks and site assessment.
Is the device waterproof?
The specifications state that it is not waterproof. Do not submerge units or use them in rain or very wet ground; follow manufacturer guidance.
What warranty does Detectors Shop provide?
A five-year warranty provided by Detectors Shop, subject to its warranty terms.
Guide Sources
Detectors Shop prepared this guide using the English manual, cross-checking the Arabic edition and the UIG Detectors River G 3 Systems page. Operating illustrations are extracted from the GER Detect manual with source attribution. Detectors Shop supplied the retail warranty, package confirmation and customer-video country.
Need help choosing or setting up a groundwater detector?
