











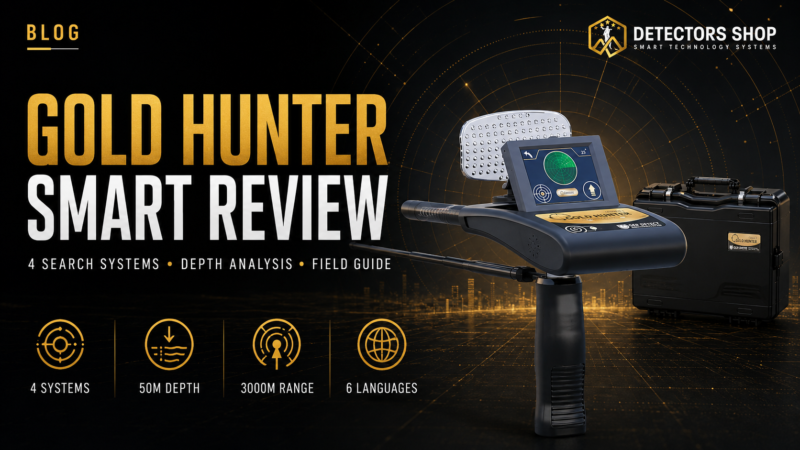
This Gold Hunter Smart review takes a close look at a multi-system long-range detector developed by GER Detect for locating metals, gold targets, diamonds, and underground voids. Rather than relying on a single search mode, the device brings four specialized systems together on one touchscreen platform, combining long-range target selection with two-dimensional result analysis and depth estimation. According to the manufacturer’s specifications, its forward search range can be adjusted from 100 to 3,000 meters, while the maximum detection depth can reach up to 50 meters under suitable conditions. With support for six languages, automatic ground adaptation, and a portable field-ready design, Gold Hunter Smart is positioned as a professional exploration tool for users who want to scan wide areas, narrow down potential target locations, and analyze results before making an excavation decision.

Table of Contents
What Is Gold Hunter Smart?
Gold Hunter Smart is a professional long-range locating and 2D analysis system developed by GER Detect in Germany. It is designed to help operators explore extensive areas for selectable metallic targets, diamonds, caves, voids, tunnels, and ancient tombs through four dedicated search systems controlled from a touchscreen interface. Unlike conventional coil-based detectors that require the user to sweep a limited area line by line, Gold Hunter Smart is intended for preliminary large-area surveying, directional target locating, and underground depth analysis. Before starting a search, the operator can select the required target, search region, and forward range according to the field task. After a potential target has been identified and confirmed from multiple directions, the 2D imaging and depth system can be used to analyze the response and estimate its underground position before excavation.
Gold Hunter Smart at a Glance
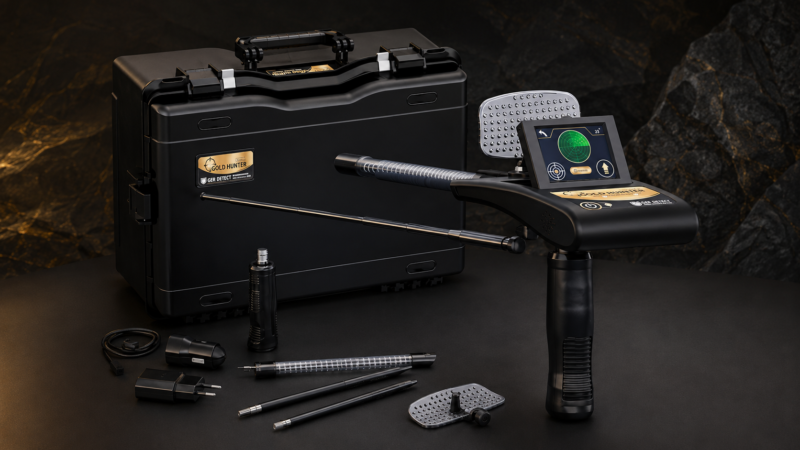
Before examining each search system in detail, the table below provides a quick overview of the Gold Hunter Smart’s main capabilities. These specifications show how the device combines wide-area long-range locating, selectable target detection, and two-dimensional depth analysis within one portable field system.
| Gold Hunter Smart | Specification |
GER Detect | Manufacturer |
| Germany | Country of Development |
| Long-range locating with 2D analysis | Detection Technology |
| 4 specialized systems | Number of Search Systems |
| 19 metal types | Selectable Metal Targets |
| Up to 50 m under suitable conditions | Maximum Depth |
| Selectable from 100 to 3,000 m | Forward Search Range |
| Metals, gold targets, diamonds, caves and voids | Main Targets |
| Touchscreen interface | Display |
| Arabic, English, German, French, Spanish and Italian | Supported Languages |
| Automatic adaptation for different terrain conditions | Ground Operation |
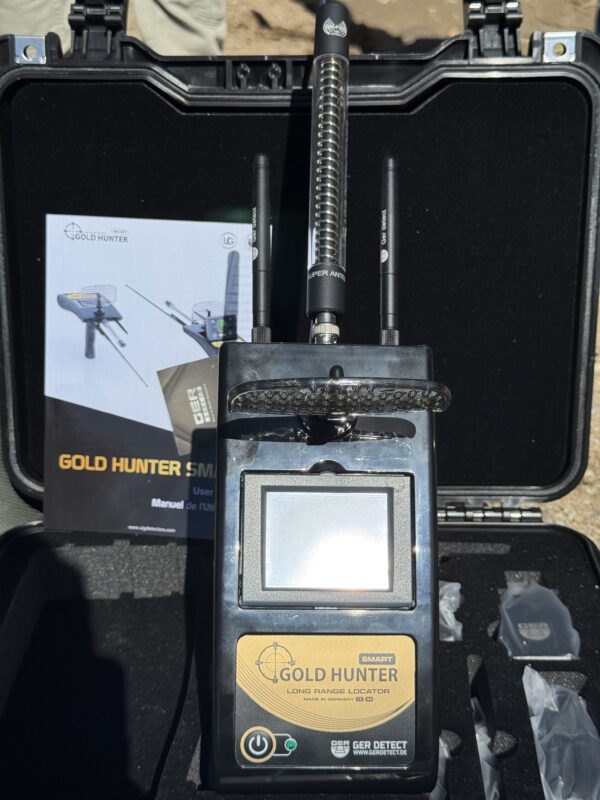
Gold Hunter Smart Parts and Components
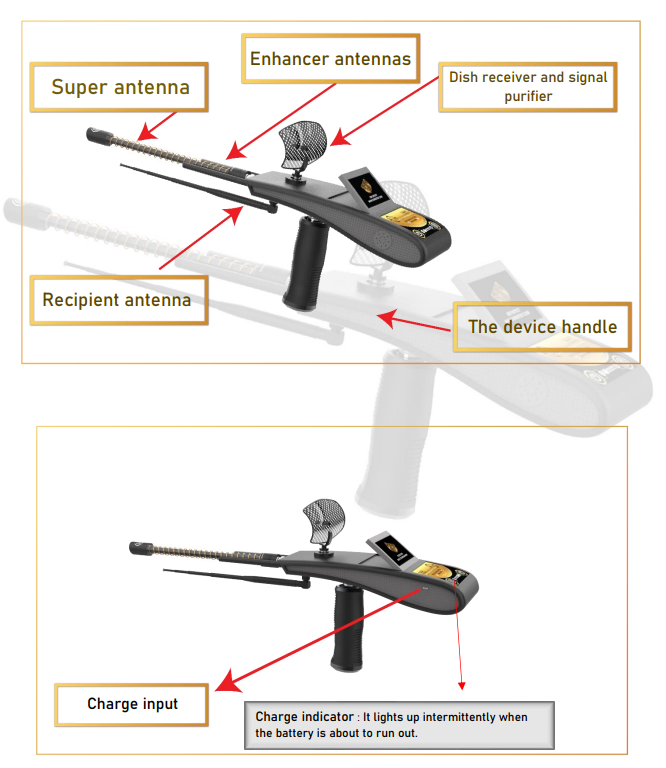
Before using Gold Hunter Smart in the field, it is important to understand the main components that make up the detection system. Each part has a specific role in device handling, signal transmission, signal reception, and target analysis. The official user manual identifies the following primary components of the main unit.
Super Antenna:
The main extendable antenna used as part of the device’s long-range search configuration. The antenna can be extended when preparing the detector for wider forward search ranges.
Enhancer Antennas:
Additional antennas installed on the front section of the device as part of the search and signal system.
Recipient Antenna:
Installed beneath the forward section of the main unit and used as part of the device’s signal-reception configuration.
Dish Receiver and Signal Purifier:
The upper receiver dish is designed to receive and improve the search signal during operation.
Device Handle:
The detachable handle allows the operator to hold and balance Gold Hunter Smart correctly during directional searching and target confirmation.
Foldable Touchscreen:
The display provides access to device settings, target selection, search range, continent selection, depth measurement, and final result analysis.
Charge Input and Battery Indicator:
The charging port is located on the main unit, while the side indicator begins flashing when the battery level becomes low and the device requires charging.
Gold Hunter Smart Technical Specifications
Gold Hunter Smart includes a full-color touchscreen interface, rechargeable internal battery, and a compact main unit designed for field use. According to the official user manual, the device uses a 320 × 240 pixel LCD touchscreen and operates across a stated frequency range of 3.2 to 16 kHz, with a data processing speed of 180 MHz.
| Specification | Details |
|---|---|
| Display | 320 × 240 px full-color LCD touchscreen |
| Frequency | 3.2–16 kHz |
| Data Processing Speed | 180 MHz |
| Operating Temperature | 0°C to 70°C |
| Operating Humidity | Up to 95% non-condensing |
| Storage Temperature | -20°C to 70°C |
| Battery Type | Internal rechargeable Li-ion battery |
| Battery Capacity | 18 Wh |
| Operating Time | Up to 10 hours |
| Water Protection | Not waterproof; weatherproof only |
| Device Weight | 325 g |
| Total Weight | 2720 g |
| Device Length | 220 mm |
| Length with Antenna | 425 mm (not extended) |
| Length with Extended Antenna | 695 mm |
| Audio Output | Dynamic speaker, 350–5500 Hz |
| Sound Output | 84 ± 3 dB |
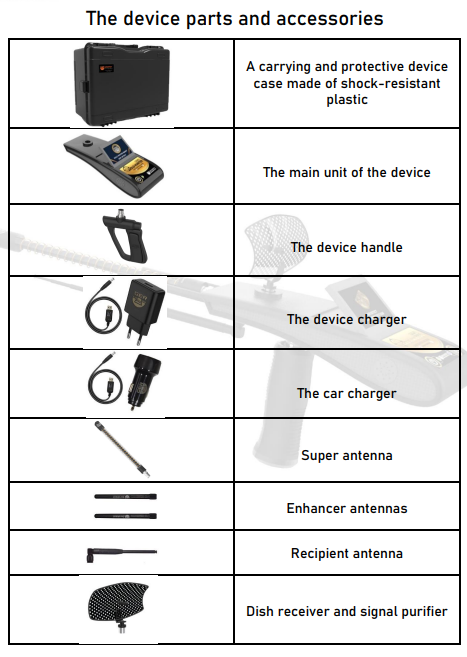
What Comes with Gold Hunter Smart?
Gold Hunter Smart is supplied as a complete field package with the main detection unit and the accessories required for setup, charging, transport, and operation.
| Included Item | Description |
|---|---|
| Protective Carrying Case | Shock-resistant plastic case designed to protect the device and its accessories during transport and storage |
| Main Unit | The central Gold Hunter Smart control and detection unit |
| Device Handle | Detachable handle used to hold and balance the detector during operation |
| Main Charger | Standard charger for the internal rechargeable battery |
| Car Charger | Vehicle charger for field charging while traveling |
| Super Antenna | Main extendable antenna used in the long-range search configuration |
| Enhancer Antennas | Additional antennas installed on the main unit |
| Recipient Antenna | Receiver antenna used as part of the signal-reception system |
| Dish Receiver and Signal Purifier | Receiver dish used to receive and improve the search signal |
The Four Gold Hunter Smart Search Systems Explained
At the center of Gold Hunter Smart are four dedicated search systems, each designed for a different type of underground target or analysis task. Instead of forcing the operator to use one general mode for every search, the touchscreen interface allows the appropriate system to be selected before entering the field. The operator can move from wide-area target locating to target confirmation, depth estimation, and two-dimensional result analysis through a structured search process.
1. Gold and Metal Detection System
The Gold and Metal Detection System is the primary search mode for locating selected metallic targets across large open areas. Through the device interface, the operator can choose from 19 target categories, including natural gold targets, buried gold objects, meteorites, silver, copper, bronze, cobalt, coltan, mercury, zinc, lead, nickel, tin, lithium, and other metals. After selecting the required target and search region, the forward range can be adjusted through several distance levels between 100 and 3,000 meters. This configuration allows the search to be adapted to the size of the site instead of using maximum range for every field task. The system is intended to help the operator identify a potential target direction, repeat the scan from multiple positions, and gradually narrow the search area before moving to target confirmation and depth analysis.
2. Caves and Voids Detection System
The Caves and Voids Detection System shifts the search away from metallic targets and focuses on identifying potential underground empty spaces. This mode is intended for field investigations involving caves, tunnels, concealed chambers, ancient tombs, and other subsurface cavities that may differ from the surrounding ground structure. The operator begins by selecting the void-search mode, defining the search range, and scanning the area from more than one direction. When a consistent response is received, the suspected location can be approached gradually and checked again from several positions to narrow the search point. The manufacturer recommends confirming any indication through repeated scans rather than relying on a single pass. Soil composition, cavity dimensions, burial depth, terrain conditions, and correct device setup can all influence the field response, making systematic scanning and operator training essential for obtaining clearer results.
3. Diamond Detection System
The Diamond Detection System is a dedicated search mode intended to survey large areas for potential indications associated with underground diamond targets. From the touchscreen interface, the operator selects the diamond mode, defines the search region, and adjusts the forward range according to the dimensions of the site. The search should then be repeated from several directions to determine whether the response consistently leads toward the same location. Rather than treating the first signal as a final result, the operator gradually reduces the search distance and approaches the suspected point through a series of controlled scans. Once the location has been narrowed, the device’s depth and 2D analysis functions can be used as part of the confirmation process. Target size, burial conditions, surrounding minerals, soil composition, device configuration, and operator technique may all influence the response, so careful field verification remains essential.
4. 2D Imaging and Depth Determination System
The 2D Imaging and Depth Determination System represents the final analytical stage of the Gold Hunter Smart search process. After a potential target direction has been narrowed and confirmed through repeated scanning, this mode is used to examine the response and estimate the target’s underground depth in meters and centimeters. The touchscreen presents the result in a two-dimensional analytical format, helping the operator interpret the detected indication before making an excavation decision. For a more reliable assessment, measurements should be repeated from a stable position while keeping the device settings, target point, and scanning direction consistent. The displayed result should be understood as an analytical representation rather than a literal photograph of the underground object. Soil conditions, mineral interference, target dimensions, search noise, and operator technique can affect the reading, which makes careful confirmation and correct field training especially important.
Watch Gold Hunter Smart in Action
Seeing the device in operation makes it easier to understand its touchscreen interface, antenna configuration, search preparation, and field handling. The following video provides a practical visual introduction to Gold Hunter Smart and shows how its components work together during the search process.
How to Use Gold Hunter Smart: Step-by-Step Search Process
For complete assembly, safety, and operating instructions, consult the official Gold Hunter Smart user manual published by GER Detect. Operating Gold Hunter Smart follows a structured sequence that begins with correct assembly and device configuration, continues with target and range selection, and ends with directional confirmation and depth analysis. Each stage affects the quality of the final result, so the operator should avoid rushing directly into the search. Maintaining device balance, reducing nearby electronic interference, and repeating the scan from multiple directions are essential parts of the recommended field procedure.
Step 1: Assemble the Device and Prepare the Search Area
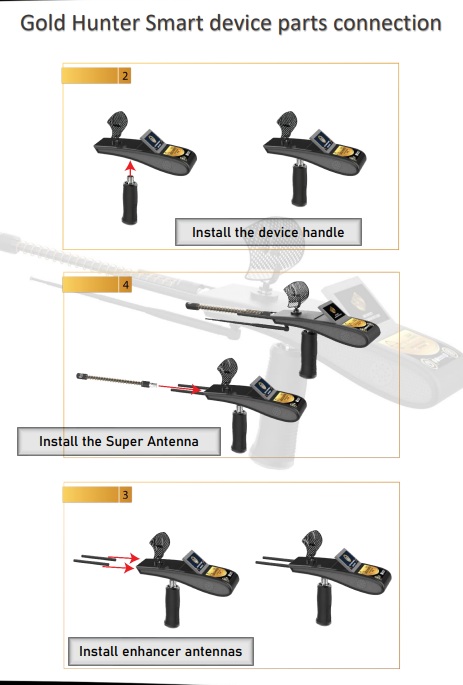
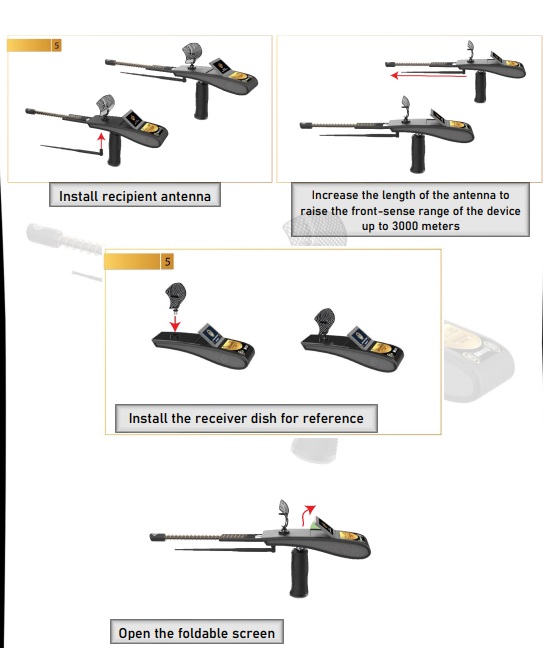
Before powering on the device, make sure the internal battery is fully charged and install the components securely in the correct order: the device handle, Super Antenna, enhancer antennas, recipient antenna, and dish receiver with signal purifier. Open the foldable touchscreen and extend the antenna according to the required forward search range. Gold Hunter Smart is weather-resistant but not waterproof, so it should not be operated in rain. The search area should also be kept away from electrical power sources, mobile network equipment, vehicles, large exposed metals, mobile phones, and active electronic devices that may increase signal noise. Once every component is firmly attached and the surrounding area has been checked for interference, the device is ready to be switched on.
Step 2: Power On and Configure the Device
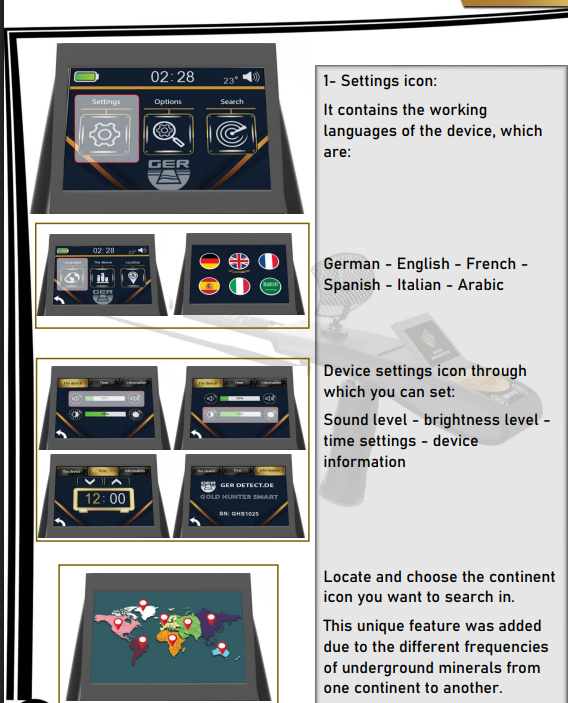
Press and hold the power button for approximately two seconds to switch on Gold Hunter Smart. Once the startup sequence is complete, the main screen displays the battery level, clock, temperature, and sound controls. Open the settings menu to select one of the six available interface languages: Arabic, English, German, French, Spanish, or Italian. From the same menu, adjust the sound level, screen brightness, time settings, and review the device information. Next, select the continent or region in which the search will be performed, as this setting forms part of the search configuration specified by the manufacturer. Before continuing, confirm that the battery indicator shows sufficient charge. If the side charge indicator begins flashing, stop the search and recharge the device using its original charger before returning to the field.
Step 3: Select the Target and Forward Search Range
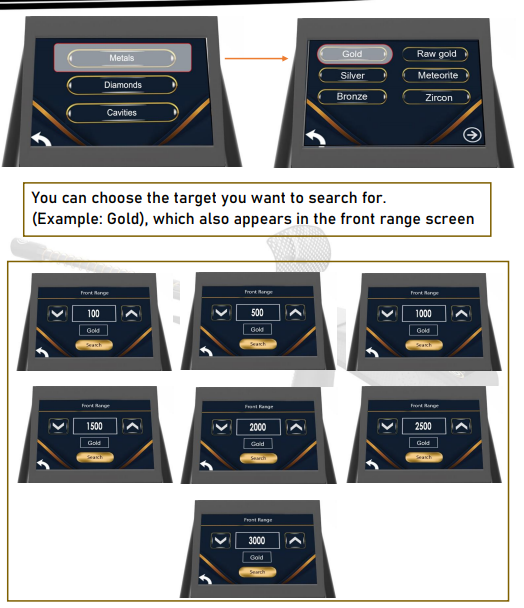
Open the search options and select the specific target you want the device to locate. Depending on the chosen search system, the available options may include gold and other metals, diamonds, caves, or underground voids. After selecting the target, set the forward search range to one of the available levels: 100, 500, 1,000, 1,500, 2,000, 2,500, or 3,000 meters. The selected range should match the approximate size of the search area. For example, when the expected target location is contained within a 500-meter area, selecting 500 meters provides a more focused survey. The maximum 3,000-meter setting is more appropriate when the potential location is unknown or when an initial scan of a very large area is required. Using the smallest practical range can help the operator narrow the search more systematically during subsequent scans.
Step 4: Begin the Search and Maintain Device Balance
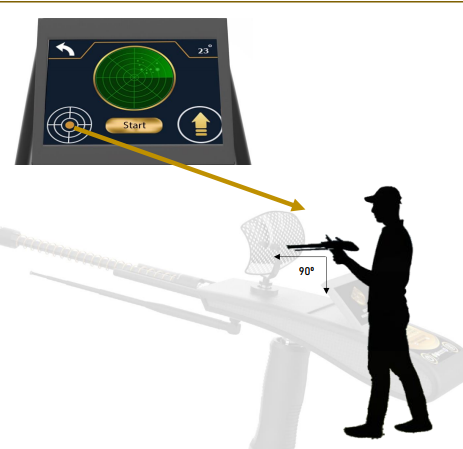
According to the manufacturer’s operating procedure, begin the search while standing on a north-to-south line and holding the device in a stable, relaxed position. Keep the balance indicator aligned by maintaining the yellow dot in the center of the on-screen circle, then press the search icon to activate the saved target, range, and continent settings. During the scan, the device produces a continuous sound while sending and receiving search signals. When a potential response is detected, the device may begin turning toward the indicated direction, the target-direction symbol appears on the screen, and the sound becomes faster. Do not force the handle toward a preferred direction or make sudden movements. Maintain balance, follow the indicated path slowly, and observe whether the same directional response appears again when the scan is repeated from a different starting position.
Step 5: Confirm the Target from Four Directions
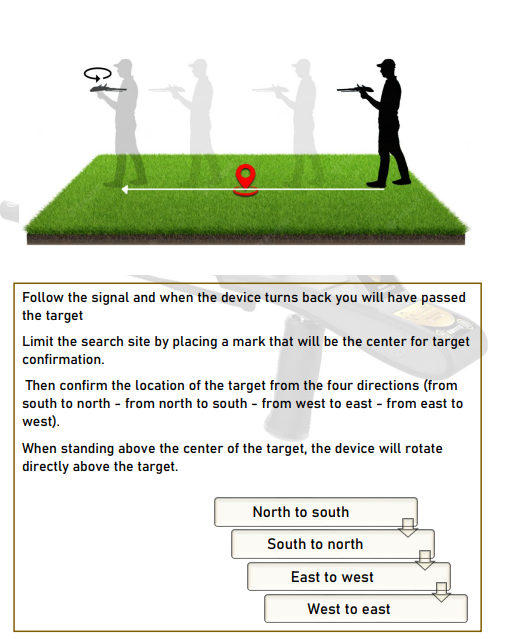
Continue following the directional response until the device turns back, which indicates that the operator may have moved beyond the suspected target point. Mark the location, then repeat the search from all four directions: south to north, north to south, west to east, and east to west. Each scan should guide the operator toward the same central area. The intersection of these directional paths becomes the provisional target center and should be marked clearly before depth measurement begins. According to the operating procedure, the device should respond consistently when the operator approaches this point from each side and may rotate directly when positioned above the center. If the four scans do not converge on the same location, reduce the search range, check for nearby interference, rebalance the device, and repeat the confirmation process instead of accepting an uncertain signal.
Step 6: Measure the Depth and Analyze the Final Result
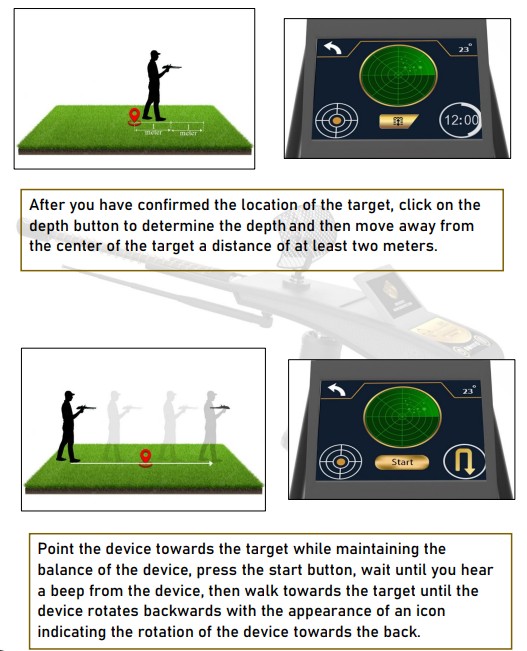
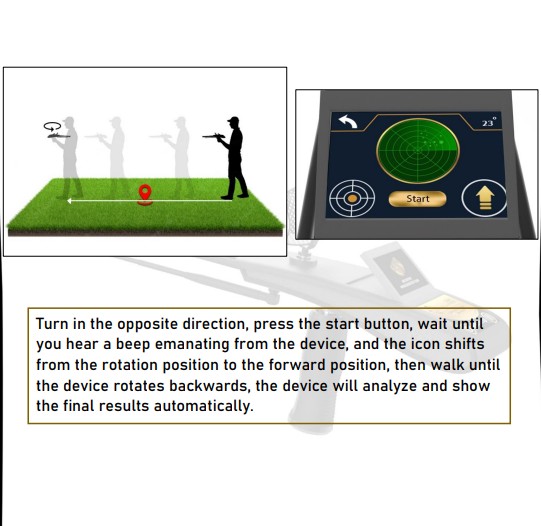
After confirming the target center, select the depth function and move at least two meters away from the marked point. Face the suspected target while keeping the device balanced, press the start button, and wait for the confirmation beep. Walk slowly toward the target until the device turns backward and the rotation indicator appears on the screen. Next, turn to face the opposite direction, press the start button again, wait for the beep, and begin walking back toward the marked point. Continue until the device turns backward for a second time. Gold Hunter Smart then processes the two measurements and automatically displays the final analysis, including the search-area noise percentage, target-confirmation percentage, estimated depth range in meters and centimeters, and a two-dimensional figure representing the detected response.
How to Read the Gold Hunter Smart Results
The final screen should be evaluated as a combined analysis rather than by relying on one number alone. Gold Hunter Smart displays four main result elements:
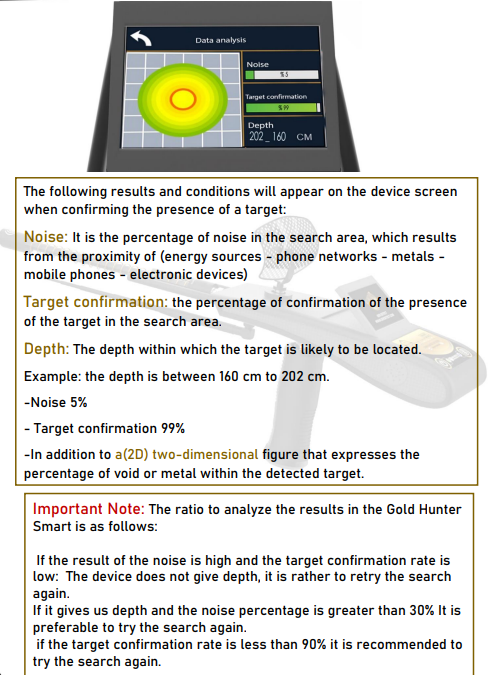
- Noise Percentage: This represents interference detected in the search area. Nearby electrical sources, mobile networks, phones, electronic equipment, vehicles, or exposed metals may increase the noise level. According to the manufacturer’s instructions, the search should be repeated when noise exceeds 30%.
- Target Confirmation: This indicates the device’s calculated level of confidence in the detected response. If target confirmation is below 90%, the manufacturer recommends checking for interference, repeating the four-direction scan, and generating a new measurement.
- Estimated Depth: The screen displays a probable depth range in meters and centimeters rather than presenting the result as one guaranteed exact point. This range should be compared with repeated measurements taken from the same confirmed location.
Understanding Gold Hunter Smart 2D Results
After the depth analysis is completed, Gold Hunter Smart displays a two-dimensional color result to help the operator interpret the detected response. According to the official user manual, the color pattern should be read together with the noise percentage, target-confirmation percentage, and estimated depth rather than used on its own.
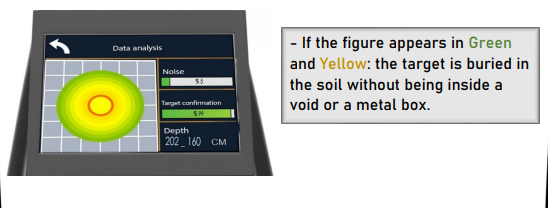
Green and Yellow:
The manual indicates that a green-and-yellow result represents a target interpreted as being buried directly in the soil, rather than inside a void or metal container.
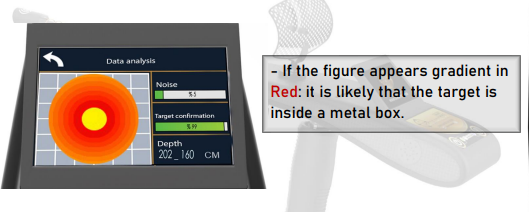
Red Gradient:
A red gradient indicates that the detected target may be located inside a metal box or metallic container.
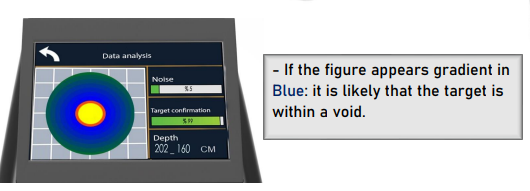
Blue Gradient:
A blue gradient indicates that the detected response may be associated with an underground void or empty space.
Gold Hunter Smart Search Tips for Better Results
For more consistent results, the Gold Hunter Smart user manual recommends following a controlled search procedure and reducing potential sources of interference before starting the scan.
Fully charge the battery before searching:
Make sure the device battery is fully charged before beginning field work. If the side battery indicator starts flashing, stop the search and recharge the device.
Avoid electronic interference:
Keep the search area away from nearby power sources, mobile networks, mobile phones, electronic equipment, and exposed metals that may increase the noise level.
Use only the original charger:
The manual specifically recommends using the original device charger.
Keep the device balanced:
During the search, maintain the yellow balance indicator in the center of the on-screen circle. Poor balance can affect directional confirmation.
Confirm the target from multiple directions:
Do not rely on a single directional response. The target location should be checked from north to south, south to north, east to west, and west to east.
Repeat the search when noise is high:
According to the manual, if the noise percentage is greater than 30%, it is preferable to repeat the search.
Repeat the search when target confirmation is low:
If the target-confirmation rate is below 90%, the manual recommends performing the search again before relying on the result.
Do not use the device in rain:
The manual warns against operating Gold Hunter Smart while it is raining. The technical specifications describe the detector as weatherproof, not waterproof.
Can Gold Hunter Smart Detect Newly Buried Targets?
According to the official user manual, freshly buried metals and targets placed directly on the ground may not produce the same response as targets that have remained underground for a long period.
The manual explains that the device’s long-range operating principle is based on what the manufacturer describes as ionic fields formed over time through the interaction of buried metals with the surrounding soil and the natural ground environment.
For this reason, GER Detect states that testing Gold Hunter Smart on newly buried objects or surface-laid metals may not demonstrate the detector’s intended long-range performance or maximum detection capability. According to the official user manual, these test conditions do not reproduce the underground environment in which the manufacturer says the device is designed to operate.
For more realistic testing, the manufacturer recommends evaluating the device under conditions that are closer to its intended field use rather than relying only on freshly buried test targets.
What Affects Gold Hunter Smart Detection Depth and Accuracy?
GER Detect specifies a maximum search depth of up to 50 meters and a selectable forward range of up to 3,000 meters for Gold Hunter Smart under suitable conditions. These figures represent maximum manufacturer-stated capabilities and should not be interpreted as guaranteed results for every target or location. Actual field performance can vary according to the target’s size, material, orientation, burial conditions, surrounding soil composition, mineral concentration, moisture, terrain, nearby electronic interference, selected search range, and the operator’s ability to maintain balance and confirm the response correctly. Larger targets and clearly defined underground structures generally produce different responses from small or irregular objects. The manufacturer also states that surface-laid metals and newly buried test targets may not represent the device’s intended long-range operating conditions. For this reason, repeated directional confirmation, controlled settings, realistic test conditions, and proper training are more important than relying only on the maximum depth or range printed in the specifications.
Gold Hunter Smart Review: What We Like
Gold Hunter Smart stands out for combining several search and analysis functions within one portable system. Instead of relying on a single operating mode, the device brings together long-range target selection, directional locating, depth estimation, and two-dimensional result analysis through one touchscreen interface.
Multiple search functions in one device:
The system is designed for several target categories, including metals, gold targets, diamonds, caves, and underground voids, giving the operator more flexibility when working in different field situations.
Adjustable forward search range:
The operator can select the forward range according to the size of the search area rather than using the maximum setting every time. Available settings range from 100 meters up to 3,000 meters.
Structured target-confirmation process:
Gold Hunter Smart does not rely only on the first directional response. The official procedure involves confirming the suspected target from four different directions before moving to depth analysis.
Useful result information:
The final analysis displays the noise percentage, target-confirmation percentage, estimated depth, and a 2D representation of the detected response.
Touchscreen and multilingual interface:
The device supports six interface languages and provides access to sound, brightness, time, device information, and regional search settings through the touchscreen.
Portable field package:
The main unit weighs 325 g, and the package includes a protective case, main charger, car charger, antennas, handle, and receiver components for field use.
Things to Consider Before Buying Gold Hunter Smart
Gold Hunter Smart is not designed to operate like a simple conventional metal detector. Its search process depends heavily on correct assembly, device balance, proper settings, directional confirmation, and careful interpretation of the final results.
Operator training matters:
The manual emphasizes correct setup and operating procedure, and incorrect use or high environmental noise can prevent the device from confirming a target or determining depth reliably.
Maximum range and depth are manufacturer specifications:
GER Detect states a maximum depth of up to 50 meters and a forward range of up to 3,000 meters, but these figures should not be interpreted as guaranteed performance for every target or search site.
Electronic interference can affect the search:
Nearby power sources, mobile networks, mobile phones, electronic devices, and exposed metals may increase the noise level and reduce result quality.
The detector is not waterproof:
The technical specifications describe Gold Hunter Smart as weatherproof only, and the manual specifically warns against using the device while it is raining.
Repeated confirmation is important:
A single response should not be treated as a final result. The device procedure relies on repeating the search from several directions and rechecking readings when noise is high or target confirmation is low.
Frequently Asked Questions About Gold Hunter Smart
What is the maximum depth of Gold Hunter Smart?
According to GER Detect, Gold Hunter Smart can reach a maximum detection depth of up to 50 meters under suitable conditions. Actual performance may vary depending on target size, soil conditions, interference, burial conditions, and operator technique.
What is the maximum forward search range?
The forward search range can be adjusted from 100 meters up to 3,000 meters. Available settings include 100, 500, 1,000, 1,500, 2,000, 2,500, and 3,000 meters.
How many search systems does Gold Hunter Smart have?
Gold Hunter Smart is designed around four main search and analysis functions that cover metal and gold targets, caves and voids, diamonds, and 2D depth analysis.
What types of metals can Gold Hunter Smart search for?
The user manual lists several selectable targets, including raw gold, gold veins, silver, bronze, cobalt, coltan, mercury, copper, lithium, meteorites, and other metallic targets.
Can Gold Hunter Smart detect caves and underground voids?
Yes. The device includes a search mode intended for identifying underground voids and empty spaces. The final 2D analysis can also display a blue gradient that the manufacturer associates with a possible underground void.
Can Gold Hunter Smart detect diamonds?
According to the manufacturer, Gold Hunter Smart includes a dedicated search function for underground diamond targets. The user manual lists diamonds among the main target categories supported by the device.
What do the Gold Hunter Smart result colors mean?
According to the official user manual, green and yellow indicate a target interpreted as buried directly in the soil, red may indicate a target inside a metal container, and blue may indicate an underground void.
What does Target Confirmation mean?
Target Confirmation is the percentage shown on the result screen that represents the device’s calculated confirmation of a detected response. The manual recommends repeating the search if the confirmation level is below 90%.
Is Gold Hunter Smart waterproof?
No. The technical specifications describe the detector as weatherproof only, not waterproof. The manual also warns users not to operate the device while it is raining.
How long does the Gold Hunter Smart battery last?
According to the technical specifications, the internal 18 Wh rechargeable Li-ion battery provides up to 10 hours of operating time.
Gold Hunter Smart Review: Final Verdict
Gold Hunter Smart combines four specialized search systems, selectable long-range coverage, directional target locating, depth estimation, and 2D result analysis within one portable platform. Its greatest value is the ability to survey large areas and progressively narrow a potential location through a structured search process. However, it is not a simple switch-on-and-dig device; proper configuration, controlled scanning, repeated confirmation, and professional training are essential. For users who understand these requirements and need a multi-target long-range system for serious field exploration, Gold Hunter Smart offers a comprehensive set of tools backed by GER Detect technology and specialist support from Detectors Shop.
