







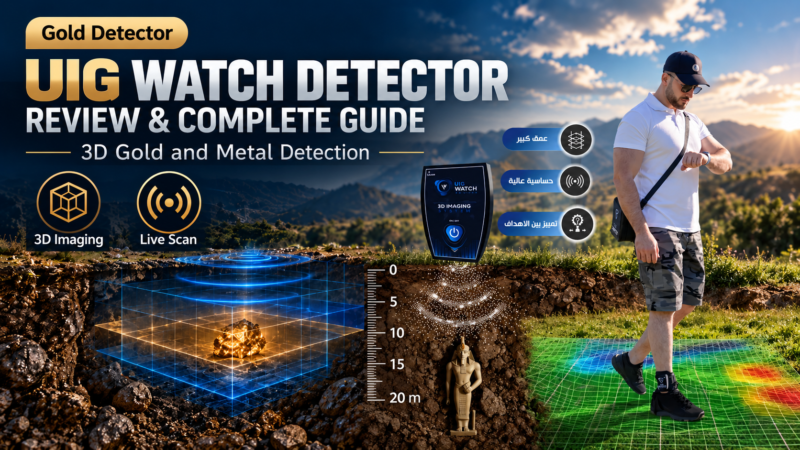
UIG Watch Detector underground exploration. Despite its very small size, it combines several scanning functions that can be used to locate metals, archaeological targets, tunnels, caves, passageways, and underground voids.
What makes the UIG Watch especially interesting is the way it combines a lightweight main unit with a smartphone and smartwatch interface. The user can perform live scans, 3D imaging, wall scans, and depth analysis while following the results directly through the connected application.
According to the official user manual, the UIG Watch uses three professional scanning and imaging techniques and can operate in seven languages, including English and Arabic. The 3D imaging system is stated to reach depths of up to 30 meters underground under suitable conditions.
This guide covers the device in detail, from its operating systems and scanning methods to target interpretation, depth estimation, specifications, accessories, and practical tips for getting better field results.
Table of Contents
What Is the UIG Watch Detector?
The UIG Watch Detector is a compact live-scanning and 3D imaging device developed for users who need more than a basic metal detector. Instead of relying only on a conventional search coil and audio signal, the system focuses on scanning, imaging, and analyzing changes beneath the ground.
The device can be used to search for precious metals, archaeological targets, tunnels, caves, passageways, and underground voids. It also includes dedicated wall-scanning capabilities, which makes it suitable for examining old structures and archaeological walls.
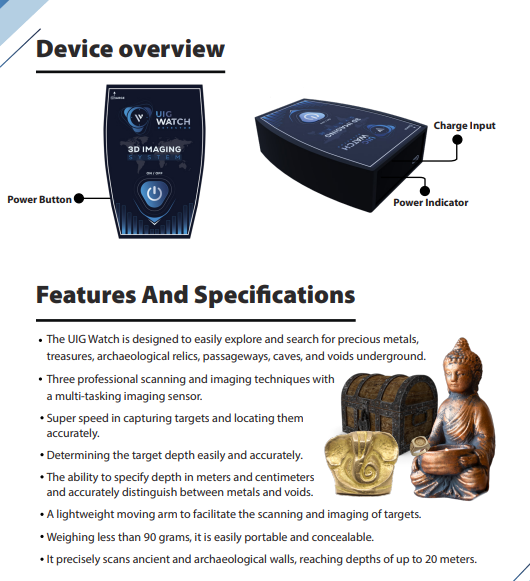
One of its main advantages is portability. The main unit weighs approximately 85 grams, making it much lighter than many traditional ground-imaging systems. The device communicates through Bluetooth and works with a smartphone application and smartwatch interface during scanning operations.
What Can the UIG Watch Detector Find?
The UIG Watch Detector is designed to detect several types of underground targets, not only metals. According to the official manual, the system can be used to search for precious metals, treasures, archaeological relics, passageways, tunnels, caves, and underground voids.
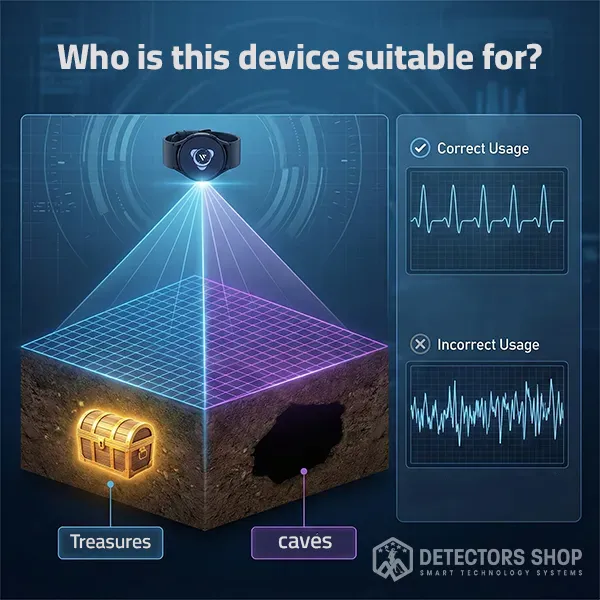
This makes the device useful in situations where the user wants to investigate both solid targets and empty spaces beneath the ground. During live scanning, the system uses different graphical responses to help distinguish between a metal target and a void.
Metal Targets
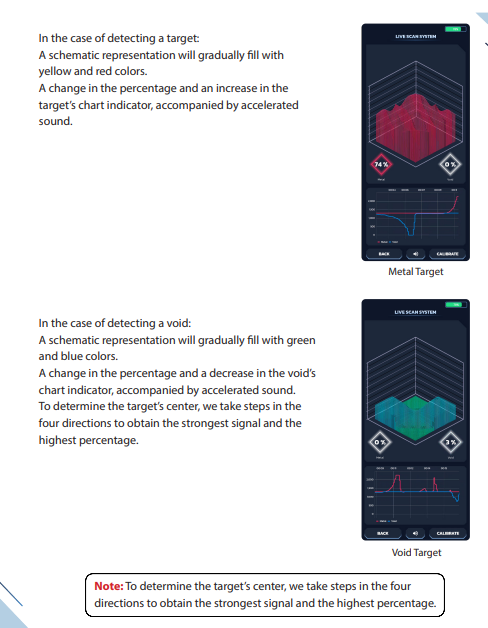
When the device detects a target during live scanning, the graphical display gradually moves toward yellow and red. The signal percentage and chart response also increase, while the sound becomes faster as the signal gets stronger.
This response can help the user identify the strongest area of the signal before moving to a more detailed scan.
Underground Voids
The UIG Watch can also detect changes that may indicate underground voids. According to the manual, a void produces a different response, with the graphical representation moving toward green, cyan, and blue tones, depending on the operating interface.
This function is particularly useful when searching for underground cavities, tunnels, caves, or other empty spaces.
Archaeological Structures and Passageways
The system is also intended for scanning areas where there may be archaeological structures or passageways below the surface.
Because the device combines live scanning with 3D imaging, the user can first identify an unusual area and then perform a more detailed imaging scan to study the target zone more carefully.
Wall Scanning
The UIG Watch Detector is not limited to ground scanning. It can also be used for scanning walls.
The manual instructs the user to hold the device horizontally and parallel to the wall at a distance of approximately 2 to 10 cm, then recalibrate when moving to a different wall.
This feature is useful when examining old or archaeological walls where there may be hidden cavities or targets behind the surface.
UIG Watch Detector Search Systems Explained
The UIG Watch Detector is built around two main working methods: Live Scan and 3D Imaging. Both systems are designed to help the user study underground targets, but each one serves a different purpose.
The Live Scan system is useful for fast target checking and signal tracking, while the 3D Imaging system is intended for a more detailed scan of a selected area. The official manual explains both systems for use with a smartphone and with the smartwatch interface.
Live Scan System
The Live Scan System is used to check the ground in real time while moving through the search area.
To begin, the main unit should be fixed securely and kept straight and stable toward the ground. After opening the application and selecting Live Scan, the device first calibrates with the soil. Once calibration is complete, the user walks slowly through the search area while keeping the device stable.
The manual recommends moving in one direction without changing direction during the scan. If the user needs to change direction, the device should be recalibrated before continuing.
During scanning, the system gives different visual and audio responses depending on what it detects.
- A metal target produces a response that moves toward yellow and red.
- A void produces a response that moves toward blue and cyan or green-blue tones.
- Sound and vibration intensity increase as the signal becomes stronger.
To locate the center of a target, the manual recommends checking the signal from four directions and identifying the point with the strongest response.
Live Scan with a Smartphone
The Live Scan system can also be operated directly through the mobile application.
After calibration, the phone display shows several elements, including a graphical signal representation, signal percentage, chart response, recalibration control, sound control, and navigation options.
This makes the smartphone useful when the user wants to see more detailed live information during the scan.
Live Scan with the Smartwatch
The smartwatch offers a more compact way to control the scan while moving in the field.
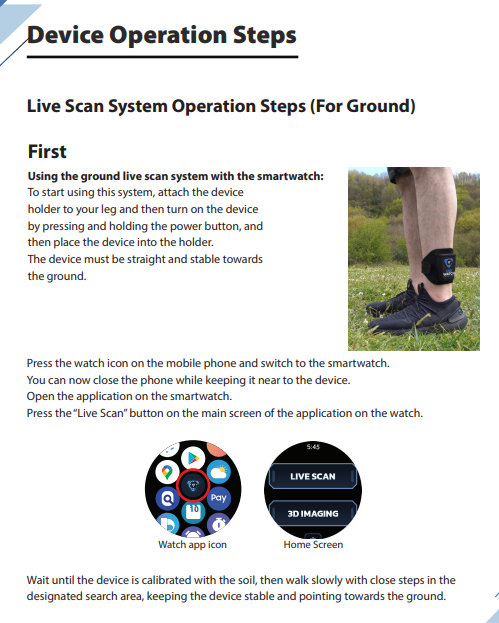
The user opens the UIG Watch Detector application on the smartwatch, selects Live Scan, waits for soil calibration, and then starts moving slowly through the selected area.
The watch can provide target or void indications through visual changes, vibration, and sound, which allows the user to monitor the scan without constantly holding the phone.
3D Imaging System
The 3D Imaging System is the more detailed scanning mode of the UIG Watch Detector.
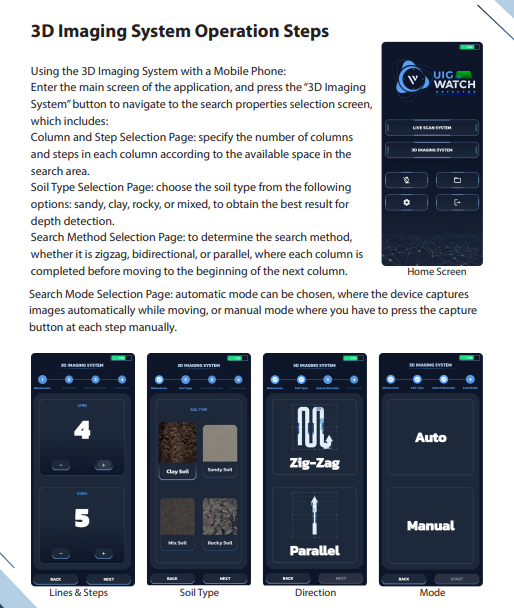
Before starting a 3D scan, the user can configure several search parameters, including:
- Number of columns
- Number of steps in each column
- Soil type
- Search direction
- Automatic or manual scanning mode
The available soil types listed in the manual are:
Sandy, Clay, Rocky, and Mixed.
The user can also choose between different search movement patterns such as zigzag, bidirectional, or parallel scanning.
Automatic and Manual Scan Modes
The 3D Imaging System includes two scan modes.
In Automatic Mode, the device captures each reading automatically as the user moves through the scan grid.
In Manual Mode, the user stops at each step and presses the capture button manually.
The manual recommends taking close, equal steps of around 30 to 40 cm while keeping the device stable and directed toward the ground.
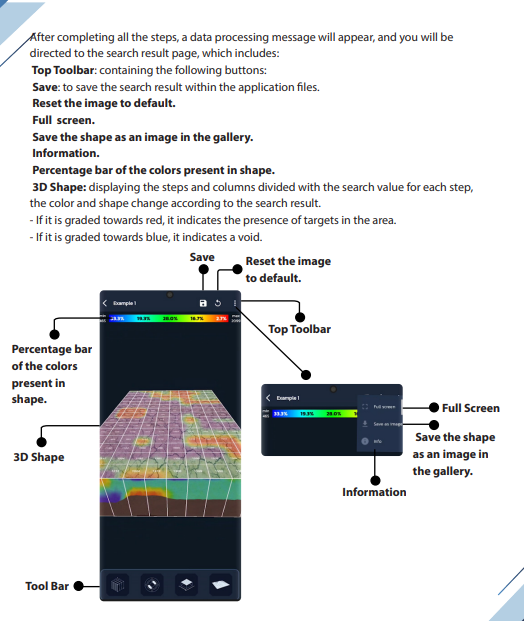
After the scan is complete, the application processes the data and displays the result as a 3D shape.
The result changes according to the captured values:
- Colors moving toward red indicate a possible target area.
- Colors moving toward blue indicate a possible void.
The user can then rotate the 3D result, change the viewing perspective, show or hide scan values, and review the area in different display modes.
How to Use the UIG Watch Detector Step by Step
Using the UIG Watch Detector correctly is important because the quality of the scan depends heavily on calibration, movement, step spacing, and keeping the main unit stable.
The official manual explains different procedures for Live Scan and 3D Imaging, but both systems start with the same basic principle: the device must be stable and correctly calibrated before the user begins moving through the search area.
Step 1: Prepare the Device
Before starting the search, make sure the battery is sufficiently charged and all required components are correctly connected.
The manual recommends reviewing the instructions before operation and avoiding nearby sources of interference such as metal objects, mobile phones, phone networks, and other electronic devices.
For ground scanning, attach the device holder to the leg and place the main unit securely inside it. The device should remain straight and stable, pointing toward the ground.
Step 2: Connect the Smartwatch
Before using the smartwatch interface, the watch must be connected to the mobile phone.
The manual describes three possible situations:
- The watch is not connected to the phone.
- The watch is connected, but the UIG Watch application is not installed.
- The watch is connected and the application is ready to use.
If the application is missing, it can be installed on the smartwatch through the phone. Once the watch and app are ready, the user can switch from phone operation to smartwatch operation.
Step 3: Select the Search System
From the main application screen, choose the system you want to use.
For a quick real-time search, select:
Live Scan
For a structured scan that produces a detailed 3D result, select:
3D Imaging
The choice depends on whether you want to quickly locate an abnormal signal or perform a complete mapped survey of a selected area.
Step 4: Calibrate the Device
Calibration is one of the most important steps.
After selecting the search mode, keep the device still and directed toward the ground while the system calibrates with the soil.
Do not start walking before calibration is complete.
If you change the search direction or move to a different area, the manual instructs the user to recalibrate the device before continuing.
Step 5: Move Slowly and Keep the Device Stable
During Live Scan, walk slowly using close steps while keeping the unit stable and directed toward the ground.
Movement should remain in one direction.
If an obstacle blocks the route, the manual recommends moving slightly to the right or left while maintaining the same general scanning direction, then continuing forward.
This is important because sudden changes in direction or device angle can affect the consistency of the scan.
Step 6: Watch the Signal Response
During Live Scan, the application displays a changing visual response based on the signal.
For a possible metal target, the graphical display moves toward yellow and red, while the signal percentage and chart strength increase.
For a possible void, the display moves toward green and blue, accompanied by changes in the chart and sound response.
The sound becomes faster as the response becomes stronger.
Step 7: Find the Center of the Target
When a strong signal appears, do not immediately assume that the first position is the center.
The manual recommends checking the target from four directions.
Move around the suspected area and compare the signal strength. The point that produces the strongest signal and highest percentage is used to identify the target center.
This step is especially useful before moving to a detailed 3D scan.
How to Perform a 3D Imaging Scan
The 3D Imaging System requires a more structured scanning process.
Step 1: Define the Search Grid
Before starting, choose the number of columns and the number of steps in each column according to the size of the area you want to scan.
For better accuracy, the manual recommends selecting the maximum practical number of rows and columns whenever possible.
Step 2: Select the Soil Type
Choose the soil type that best matches the search area:
- Sandy
- Clay
- Rocky
- Mixed
This setting is used by the system during depth analysis.
Step 3: Choose the Search Direction
The application offers several scanning patterns, including:
- Zigzag
- Bidirectional
- Parallel scanning
Choose the pattern that best fits the shape and size of the area.
Step 4: Choose Automatic or Manual Mode
In Automatic Mode, the system captures a reading automatically after each step.
In Manual Mode, the user stops and presses the capture button manually at each scanning point.
Both methods can produce a 3D scan, but manual mode gives the operator direct control over the exact moment each reading is recorded.
Step 5: Begin the Scan
Stand still, stabilize the device toward the ground, and press Start.
The device calibrates with the soil before the scanning screen appears.
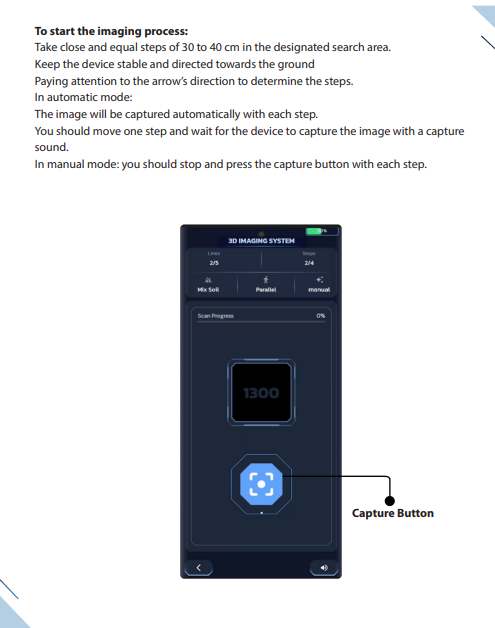
During the scan, the screen shows information about:
- Current and remaining columns
- Current and remaining steps
- Search progress percentage
- Movement direction
- Captured search values
Step 6: Keep Equal Step Distances
The manual recommends taking close and equal steps of approximately 30 to 40 cm.
Keep the device stable and directed toward the ground throughout the scan.
In automatic mode, move one step and wait until the device captures the reading before taking the next step.
In manual mode, stop after every step and press the capture button.
Step 7: Review the 3D Result
After all columns and steps are completed, the application processes the collected data and displays a 3D result.
The manual describes the result as follows:
- A result moving toward red indicates a possible target.
- A result moving toward blue indicates a possible void.
The result can then be rotated, displayed in 2D or 3D, viewed from different angles, and saved for later analysis.
How to Read UIG Watch Detector 3D Scan Results and Determine Target Depth
Reading the UIG Watch Detector 3D scan results correctly is one of the most important parts of using the device. The system does not only show whether a signal is present; it also provides a visual 3D representation of the scanned area so the user can study the location, shape, intensity, and possible depth of the detected anomaly.
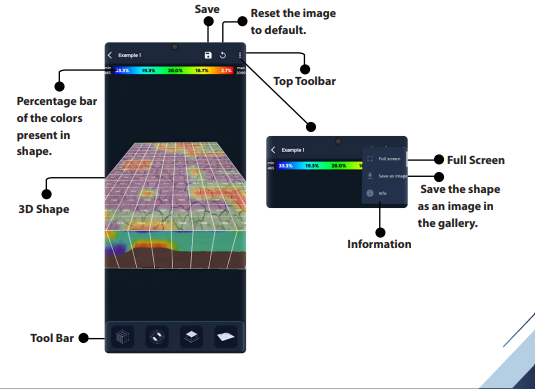
After the scan is completed, the application processes the captured data and displays a 3D shape made from the values collected at each step and column. The color and shape of the result change according to the scan data. According to the official manual, results graded toward red indicate the presence of a target, while results graded toward blue indicate a void.
Understanding the 3D Color Results
The 3D result uses color differences to help the user interpret the scanned area.
A stronger shift toward red is associated with a possible target response, while a stronger shift toward blue is associated with a possible underground void. The application also includes a color percentage bar that helps the user understand how much of each color is present in the final 3D shape.
The manual does not state that color alone identifies a specific metal type. For that reason, the safest interpretation is to use the colors to distinguish between a likely target response and a likely void response, rather than claiming that a particular color confirms gold or another specific metal.
Locating the Target Inside the Scan Area
The application includes tools that allow the user to identify the location of a target or void within the scanned grid.
The manual states that one of the toolbar functions can identify the location of the target or void in the search area and provide depth information for areas with a high probability of containing a target or void.
This is useful after the 3D scan is complete because it helps the user connect the visual anomaly on the screen with a physical location in the scanned area.
Determining Target Depth
The UIG Watch is designed to estimate the depth of detected targets and voids.
The official manual states that the device can determine target depth and display the measurement in meters and centimeters.
Within the 3D result tools, the user can select the target or void location and obtain a depth estimate for the area with the highest probability of containing the anomaly.
It is important to understand that the manual describes this as a depth result associated with the high-probability target or void area. It should therefore be treated as a scan-based estimate rather than an absolute measurement.
Use Multiple Views Before Making a Decision
The 3D analysis screen allows the user to study the result from different perspectives.
Available options include:
- Full 3D view
- Diagram view
- 2D view
- Showing or hiding scan values
- Showing or hiding the surface or wall
- Changing the viewing perspective
- Changing the color map
- Increasing or decreasing the shape resolution
Using more than one view can make it easier to understand where the strongest anomaly appears and whether its position remains consistent within the scan.
Save the Scan for Later Analysis
The application allows the scan result to be saved for later review.
The user can save the full search result inside the application, save the 3D shape as an image, and add a name or notes to the saved search operation.
This is especially useful when comparing more than one scan of the same area.
A Practical Way to Confirm a Suspicious Area
For a more reliable interpretation, it is better to compare the result with another scan of the same area rather than relying on one image only.
The manual specifically recommends using the maximum practical number of rows and columns for better accuracy.
A larger and more consistent scan grid generally gives the application more measurement points to display, which can make the final 3D shape easier to interpret.
UIG Watch Detector Technical Specifications
The UIG Watch Detector combines a compact design with technical features intended for field scanning and 3D imaging.
According to the official user manual, the main unit operates at 1 kHz, uses 2.4 GHz Bluetooth, and provides an operating time of up to 10 hours with its internal rechargeable battery. The device is weatherproof, but it is not waterproof, so it should not be used in rainy conditions or exposed directly to water.
The internal battery is a 3.7 V Li-ion battery with a capacity of 5.18 Wh. The charger operates with an input range of 90–250 VAC, 50–60 Hz, and provides a USB output of 5 VDC / 2100 mA.
Main Technical Specifications
- Operating frequency: 1 kHz
- Data processing speed: 72 MHz
- Bluetooth: 2.4 GHz
- Operating time: Up to 10 hours
- Internal rechargeable battery
- Battery type: Li-ion 3.7 VDC
- Battery capacity: 5.18 Wh
- Waterproof rating: Not waterproof – weatherproof only
- Main unit weight: 85 g
- Total package weight: 580 g
- Carrying bag dimensions: 210 × 185 × 95 mm
UIG Watch Package Contents
The UIG Watch package includes the main components required to operate and transport the system.
According to the official manual, the package contains:
- UIG Watch main unit
- Smartwatch
- Carrying bag
- Device carrier
- Charger
- Charger cable
- Car charger
- Smartwatch charger
- Warranty card
The smartwatch is supplied with the device to support convenient field operation and access to Live Scan and 3D Imaging functions.
Important Tips for Better UIG Watch Results
Like any scanning and imaging system, good results depend on more than simply turning on the device and walking over the search area.
Proper calibration, stable movement, correct soil selection, and consistent scanning are essential.
Always keep the main unit stable and directed correctly during the search. Sudden movements or unnecessary changes in direction can reduce the quality of the scan.
When performing 3D imaging, use equal steps and maintain approximately 30 to 40 cm between each step, as recommended in the official manual.
For better scan accuracy, the manual also recommends using the maximum practical number of rows and columns in the search area.
If you change direction during a Live Scan, stop and recalibrate the system before continuing.
Important Safety and Operating Notes
Before using the UIG Watch Detector, several important operating instructions should be followed.
The device should not be used during rainy conditions, and all components should be properly connected before starting a search.
The battery should be sufficiently charged before operation. The manual recommends recharging it before the battery level drops below approximately 10%.
Users should also avoid nearby sources that may interfere with the scanning process, including electronic devices, mobile phones, metal objects, and other sources of electromagnetic interference.
Only the original charger supplied with the device should be used.
UIG Watch Detector Warranty
According to the official user manual, the main electronic unit is covered by a two-year warranty against electronic malfunctions.
However, the warranty does not cover damage caused by misuse, impacts, opening the unit, drops, or other user-related damage.
The manual also states that the smartwatch, battery, charger, and other accessories are excluded from the main unit warranty.
For this reason, users should carefully follow the operating instructions and protect the main unit and accessories during transportation and field use.
Who Is the UIG Watch Detector For?
The UIG Watch Detector is suitable for users who want a compact system capable of combining live scanning and 3D imaging in one portable setup.
It can be useful for users interested in:
- Searching for underground metal targets
- Investigating archaeological areas
- Detecting underground voids
- Searching for tunnels and caves
- Examining passageways
- Scanning archaeological walls
- Creating 3D images of selected search areas
Its lightweight design also makes it practical for users who prefer a system that is easier to transport than many larger ground imaging devices.
UIG Watch Advantages
One of the main advantages of the UIG Watch is the combination of multiple scanning functions in a very compact device.
The main unit weighs approximately 85 grams, while the system provides Live Scan and 3D Imaging capabilities through smartphone and smartwatch operation.
Other important advantages include:
- Live target and void scanning
- 3D underground imaging
- Ground scanning
- Wall scanning
- Target center identification
- Depth estimation
- Automatic and manual scanning modes
- Multiple soil type settings
- Smartphone operation
- Smartwatch operation
- Seven supported languages
The manual lists the supported languages as English, Arabic, Spanish, French, German, Portuguese, and Persian.
Is the UIG Watch a Gold Detector?
The UIG Watch is designed to search for underground metal targets, archaeological targets, tunnels, caves, passageways, and voids. It combines Live Scan and 3D Imaging technology rather than operating like a conventional coil-based metal detector.
How Deep Can the UIG Watch Detector Reach?
According to the official user manual, the 3D Imaging System can reach a maximum stated depth of up to 30 meters underground.
The actual scan result depends on the search conditions, scan setup, target area, and correct operation of the system.
Can the UIG Watch Detect Underground Voids?
Yes. The system is designed to detect underground voids in addition to metal targets.
During Live Scan and 3D analysis, void responses are represented differently from target responses.
Can UIG Watch Detect Tunnels and Caves?
The official manual lists tunnels, caves, passageways, and underground voids among the types of underground structures the device is designed to search for.
Does UIG Watch Have 3D Imaging?
Yes. The device includes a dedicated 3D Imaging System that allows the user to define a scan grid, select soil type, choose the search direction, and operate in automatic or manual scanning mode.
Can UIG Watch Determine Target Depth?
Yes. The official manual states that the system can determine target depth and display measurements in meters and centimeters.
Can UIG Watch Scan Walls?
Yes. The device includes wall-scanning functionality.
During wall scanning, the unit should be kept parallel to the wall and positioned approximately 2 to 10 cm from the surface.
Can I Use the UIG Watch with a Smartwatch?
Yes. Live Scan and 3D Imaging functions can be accessed through the compatible smartwatch application after the watch is connected and the UIG Watch application is installed.
Can I Use UIG Watch with a Smartphone?
Yes. The smartphone application can be used for Live Scan, 3D Imaging, scan setup, and detailed analysis of the final 3D results.
How Long Does the Battery Last?
The official technical specifications state an operating time of up to 10 hours.
Is the UIG Watch Waterproof?
No. According to the official technical specifications, the device is weatherproof only and not waterproof.
What Soil Types Can Be Selected?
The 3D Imaging System allows the user to select:
Sandy soil
Clay soil
Rocky soil
Mixed soil
What Do Red and Blue Colors Mean in the 3D Scan?
According to the official manual, scan results that move toward red indicate a possible target, while results moving toward blue indicate a possible void.
Where to Buy the Original UIG Watch Detector
When purchasing an advanced imaging detector such as the UIG Watch Detector, it is important to buy from a trusted supplier that can provide the original device, proper support, and guidance on correct operation.
At Detectors Shop, customers can get more information about the UIG Watch Detector, its available package, current price, shipping options, and product support.
For full product details, visit:
UIG Watch Detector Product Page
Final Verdict – Is the UIG Watch Detector Worth Considering?
The UIG Watch Detector stands out mainly because of the amount of scanning functionality packed into a very small and lightweight system.
It combines Live Scan, 3D Imaging, ground scanning, wall scanning, target and void identification, and depth estimation while allowing the user to operate the system through a smartphone or smartwatch.
According to the official manual, the 3D Imaging System has a stated maximum search depth of up to 30 meters, while the wall-scanning capability is stated at up to 20 meters.
Its compact 85-gram main unit, multiple scanning modes, soil selection options, and 3D analysis tools make it an interesting solution for users who want a portable imaging system for investigating underground targets and voids.
However, accurate results depend heavily on correct calibration, stable movement, equal scanning steps, proper soil selection, and careful interpretation of the final scan.
For users willing to learn the correct scanning technique and follow the operating instructions, the UIG Watch Detector offers a versatile combination of portability, live scanning, and 3D underground imaging in one system.
Final CTA
Looking for the original UIG Watch Detector?
Explore the full specifications, price, availability, and shipping options from Detectors Shop.
View UIG Watch Detector:
https://detectors-shop.com/product/uig-watch-detector/
